Rim to Rim to Rim in a Day: Nutrition

Fueling for a long day on trail can make or break the outcome of your hike. As you can imagine, I’m pretty intentional about giving my body what it needs to succeed, especially when I’m undertaking a physically stressful endeavor, such as hiking 40+ miles with 11k’ of elevation gain in a day. This post covers my Rim to Rim to Rim (R2R2R) nutrition strategy.

If you’re interested in reading a full account of my hike, please see this post, where I discuss the gear I wore/carried as well as details from my day of hiking in the Grand Canyon.

What follows is a list of what I ate during my day of hiking R2R2R. Of course, how I eat, move, sleep, etc. on a daily basis has a greater overall impact on performance than what I do in one 24 hour period, but for those interested, here’s how I approach fueling a long day of hiking.

I’ll also explain a bit about why I chose what to eat and why I chose to eat it when I did. The intention is to provide insight into how I eat for endurance and lasting energy, and hopefully you can take some tips away to use on your own adventures.

rim to rim to rim food

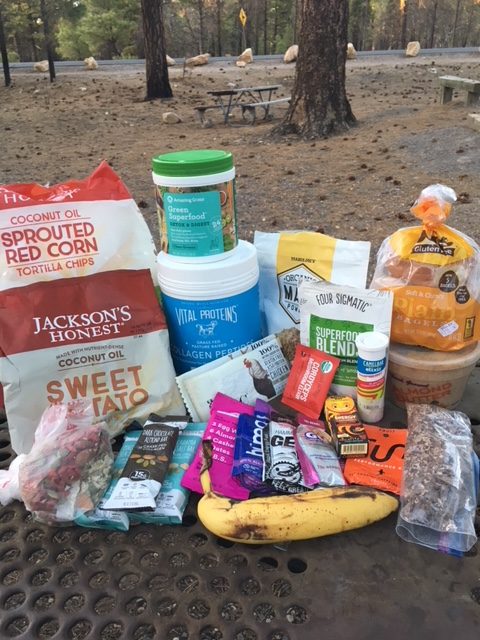
This photo provides a general idea of the food I brought with me to the Grand Canyon, from which I would choose what to carry on my R2R2R hike. I didn’t take all of this and I only carried a serving or two of the items pictured in bulk (e.g. the greens powder, the protein powder, the almond butter). Some of it I didn’t take at all (e.g. the bagels and the coconut chocolate).

To determine how much to carry, I used calories as the primary metric. Because I wanted to be sure I had plenty for an over-nighter should I need to stay in the canyon, I carried a bit extra, and aimed for ~4,000 calories.

Here’s approximately what I ate and when, followed by an explanation of why.

5am: 3 scoops Vital Proteins Collagen Peptides + 1 scoop Trader Joes Organic Maca Powder + Four Sigmatic 10 Mushroom Blend + 1 scoop Amazing Grass Superfood + 1 spoonful almond butter (my favorite is Natural Grocer’s fresh ground… so fluffy and creamy) + 12 oz. strongly brewed Puehr Tea.

Supplements taken with breakfast: 1000 mg Vitamin CSelenium, Zinc, Omega Complex and Cellular Vitality Complex (found here, search lifelong vitality pack).

8am: Primal Kitchen Bar

10am: 1 banana, a couple servings Jackson’s Honest Sweet Potato Chips

12pm: 2 homemade date bites (similar to this recipe)

1pm: More sweet potato chips + 1 spoonful almond butter

3 pm: Primal Kitchen Bar

4pm: 1 date bite

5:30 pm: Good Day Caffeine Chocolate, 2 spoonful almond butter, a couple servings Jackson’s Honest Sprouted Red Corn Tortilla Chips

6 Nuun electrolyte tablets in water throughout day

Explanation

Whatever time you choose to break your fast (breakfast), it’s arguably the most important part of the day, nutritionally speaking. I started the morning with 30 grams of protein and a healthy fat, as I often do, whether on trail or off. This breakfast is satiating, so I don’t have to think about fueling again as quickly, and it also boosts leptin, a hormone which decreases appetite and leaves me feeling more satiated for the rest of the day.

I find that having a high carb/high sugar breakfast puts me on an insulin roller coaster of sugar spikes and crashes. High carb breakfasts cause me to be hungry an hour later, after the sugar has worn off, and I find myself craving more carbs. There’s nothing wrong with carbs, and of course, they’re necessary for glucose-dependent activities such as hiking, but glucose (carbs) is a quick-burning fuel. Adding fat and protein to meals slows down digestion and creates slower-burning, longer lasting, more stable energy. Adding fat and protein to pretty much everything I eat balances blood sugar and helps me have stable energy all day.

In an effort to postpone getting into too much of a calorie deficit, I had a protein bar after I reached the river, while walking through the canyon. Food would be easier to digest during easy walking. Our bodies only process about 200-300 calories per hour, so I try to eat throughout the day, so I can keep moving, as opposed to eating a lot at once.

Right before beginning the climb to the North Rim, I wanted to take in a decent amount of carbs to fuel me, so I had a banana and chips. I also knew I’d be in the sun and beginning to sweat a lot, which is why I chose a salty snack. The potassium from the banana was also helpful for mineral balance while sweating.

About 2 miles from the North Rim, it was getting hot and I was hitting a wall, so I had a couple of date bites, which are high carb, but with a little fat and protein.

At the rim, I took a short break for some chips and almond butter to replenish some salt, and because it’s my favorite trail snack. I also wanted the carbs and fat to fuel me on the way down.

Back at the bottom, walking along the river, I was beginning to get tired, so I had another bar and a date bite to keep me moving.

My last snack was before crossing the river, heading back up to South Rim. I chose caffeine chocolate to give me an extra boost on the 5,000′ climb, chips for the salt and carbs, and almond butter for the fat to fuel the last 7 miles. I probably should’ve snacked again on some carbs a couple miles before the end because I was definitely hitting a wall, but I pushed on instead.

I made sure to drink a lot of water throughout the day, especially at sources, where I would ‘camel up’. I added Nuun tabs to replenish electrolytes lost through sweat.

Whatever your adventure, whether long or short, hopefully this provided some insight into how I think about maintaining energy for a long day outdoors.

For a deep dive into performance nutrition and meal planning for backpackers, check out our online course on the topic.

grand canyon

Fueling a Healthy Adventure on a Budget

wind river hike

This post originally appeared on the Trek


Besides “Do you carry a gun,” one the most common questions on trail is “What do you eat?

From battling constant hunger, to pack weight considerations, to sticking to a budget, planning your food strategy can be one of the most challenging aspects of a long-distance hike. If you want to eat healthy on trail? That can feel even more daunting. Aside from gear, food is one of the biggest expenses of a thru-hike.

A trait I’ve noticed in the most savvy, enduring hikers—those who find the resources to hit the trail again and again—is frugality. I don’t mean simply being cheap—I’m referring to an ability to optimize and use one’s resources wisely. Whether you’ve got a $3,000 budget or a $10,000 budget for your hike, the goal is finding the sweet spot of saving money without feeling deprived.

happy hikers sunset

If you don’t know your budget, try to figure it out. In 2017, running out of money was the second-leading cause of hikers quitting the AT and PCT, second only to injury. Make a plan and do your best to stick to it. More on that in a moment.

Many hikers believe that eating healthy on trail is more expensive than eating junk food. They also assume it’s time-consuming and difficult, which can drive many otherwise healthy eaters to choose readily-available, packaged foods. If you’re not sure how healthy eating can increase your performance on trail, check out this article about the potential dangers of fueling on processed foods.

Tips for hiking healthy on a budget

Yes, it’s possible to eat well on trail without breaking the bank. Once you train your mind to optimize for both healthy and budget-friendly options, they’ll start popping out everywhere. All recommendations are designed to be calorie-dense, nutrient-dense, and as lightweight as possible.

budget

Preparation before hitting the trail

Planning for a thru-hike is a lot of work, but preparing for a life-changing endeavor is part of the excitement. As far as food prep goes, I’m not going to sugarcoat it: healthy eating on a budget involves more effort than winging it and hoping you don’t go broke. Having a plan will prevent impulse spending and easily avoidable budget mistakes.

Many hikers are ambitious Type-A planners anyway, so dig into the details, make a spreadsheet, and have fun optimizing.

How to prepare in advance:

  1. Determine your resupply strategy. Will you be mailing boxes, resupplying in towns, or a combination of both? Do your research and choose what’s right for you. For the purposes of healthy eating and saving money, I’ve found a mix of in-town resupply and maildrops to be optimal. If you prefer hard-to-find items, such as specific supplements or protein powders, or if you have food intolerances, consider sending those items to your resupply location, and buy common items, such as cured meats, nut butters, and trail mix in town.
  2. Look over your potential resupply locations. In the places where a gas station or tiny store is your only option, send a box. Otherwise, you’re stuck paying high prices for less than optimal food. Five dollars for a Snickers bar? No thanks.
  3. Now that you know how many boxes you’re sending and where you’re sending them, it’s time to gather food. It’s beyond the scope of this article to detail how you determine your food requirements, but as a general rule, it will be based on your body size (and correspondingly, your base metabolic rate) plus how many miles you plan to hike per day. For example, I need about 3,500 calories per day—or about two pounds of food—to fuel 25-30 mile days once I’m a few weeks into a thru-hike. If it’s colder or the terrain is particularly rugged, that fuel requirement amount increases. Each person will have different needs based on their size, climate, terrain, etc. Make a list of healthy trail foods you know you’ll enjoy. Consider dried fruit, dehydrated beans and veggies, oats, quinoa, nuts, and nut butters, plus any other whole foods. The shorter the ingredient list, the better. For additional ideas, dive online or reference my ebook.
  4. With this list in hand, search online for the best price. Buying in bulk is a great way to cut costs.
    1. Consider Costco, Trader Joes, and grocery outlets like Shop’n’Kart, where you can find both conventional and organic options at lower prices. Find stores with bulk bins, which not only cuts down on packaging, but is often where you’ll find more whole-food options like nuts, dehydrated beans and grains, and dried fruit.
    2. Watch out for freeze-dried meals or protein bars marketed as “backpacking food.” These are often overpriced and not always particularly healthy. With a little know-how and experimentation, creating your own healthy meals can be easy and inexpensive.
    3. Consider shopping online. Find dehydrated fruits, veggies, and beans here and here . Choose products with nothing added-just the fruit/veggie/bean. Rehydrating these on trail is simple and an easy way to pack in fiber and vitamins. There are many online hubs for healthy snacks including Vitacost and Direct Eats.
    4. Depending on time and budget, you may opt to dehydrate some of your own meals. This is more labor intensive, but can save money in the long run. If you have access to inexpensive organic produce, a dehydrator, and you enjoy the process, consider this option. However, dehydrating your own meals is not essential for eating healthy on a budget.
    5. Brainstorm options based on personal connections, and where you live. Do you have a friend in the restaurant industry? Ask them if you can tack on items to their next wholesale order, or ask if they’ll take you to Restaurant Depot. Pay them back promptly and do them a favor in the future. I worked as a pastry chef before my PCT hike and this strategy is how I made 30 pounds of various trail mixes for much cheaper than purchasing retail.
    6. Once you have all your materials, sort them into location-specific boxes. The amount of food in each box will depend on your daily calorie requirements, your daily mileage, and the distance to the next resupply point. Estimate for now, then dial it in on trail and make adjustments. Supplement your box with town purchases or hiker box snacks. Repackage food into appropriate serving sizes and divvy the food up into boxes. Spreadsheets are great for this.

For the love of whole foods

Eating more whole foods means you need less food. Even if personal and planetary health is low on your list of priorities, pretty much everyone cares about saving money and reducing pack weight. Research suggests that the added fiber, essential fatty acids, protein, and micronutrients in whole foods are more satiating and filling than ultra-processed foods. This means you can eat less, buy less, and carry less. Win win win.

cascade locks pct

On trail and in town

It can be hard not to spend a ton of money when you walk into a town famished. You’ve been dreaming about burgers, pizza, and beer for the last 100 miles. Enjoy yourself, but remember to have a plan.

  1. If you have a resupply box, pick it up before going to the store. Pack your food bag, and use extra food as town snacks. Yes, you’ll want to eat 24/7 while in town, but lessen the blow to your wallet by snacking on food you’ve already paid for.
  2. Take advantage of hiker boxes before you resupply at the grocery store. Sometimes you find gems like nut butters, healthy bars, olive oil packets, and dehydrated veggies. Be judicious, don’t empty the entire box into your food bag, and be sure to pay it forward by donating to hiker boxes down the line.
  3. At restaurants, have a tall glass of water (or three) and a salad before binging on all the pizza and ice cream. Celebrate that you didn’t have to carry that water from the source. When you fill up on veggies and hydrate yourself, not only are you making up for micronutrient deficiencies in your normal veg-poor diet, but you won’t need three large pizzas, two burgers, a case of beer, and a gallon of ice cream to feel full. Plus, the extra fiber will benefit your gut microbiome, which impacts your immunity, energy levels, and mental health.
  4. Buy in-town meals and snacks from the grocery store rather than going to restaurants for every meal. You’ll eat healthier and spend less. Pick up materials for a deluxe salad to make at the hotel room. Grab a bag of veggies to finish before hitting the trail again. Shop at stores with bulk bins, so you can get the exact amount you need and reduce packaging. Team up with your hiking buddy to add variety and split purchases when a desired item comes in a bigger size than you need.
  5. Buy from the grocery store rather than a gas station or small market. You’ll find healthier options, fresher food, and lower prices.
  6. Limit your time in town. Ultimately, spending time in town costs money—everything from lodging to food to transportation, so get in, get your chores done, rest, and get back out.

pacific crest trail

The Most Important Rule: Know Thyself

  • How much prep are you willing to do? Remember that buying is easier than dehydrating your own food.
  • What do you actually like to eat? Test it out before you send it in every resupply box.
  • Do you mind eating the same thing everyday? I don’t, but many people need variety.
  • How much do you eat? Hiker Hunger is real and it will set in eventually.
  • Are you prone to impulse buys in town? Set yourself up for success. Enjoy a good meal or two, but keep your long-term goal in mind.

Sticking with your budget shouldn’t feel like deprivation. It should feel good because you’re being considerate to your future self who wants to have the health and cash to finish the trail.

Pay attention

This final tip is simple, but generally overlooked (on and off trail). Awareness is the first step to behavior modification. Pay attention to where your resources are going. If you’re always looking for ways to optimize eating healthy and cheaply, the opportunities present themselves.

Small improvements in your eating and spending habits add up to big changes. You make it to the end of the 2000-mile trail one step at a time.

Wind River High Route

Better Late Than Never

It's October and I'm just now posting a brief recap of my hike on the Wind River High Route this past August. It's worth a review as this was some of the most stunning alpine trekking I've done.

We (mostly) followed the Alan Dixon route. It was roughly 80 miles and took us just over 5 days to complete.

The fun started the evening of July 30 when I picked up JR from DIA. I had seen JR briefly the previous October, but we hadn't hiked together since the miles we shared in Oregon and Washington on the PCT, finishing our thru hikes together at the Canadian border.

Most of July 31 was spent driving from my home in Colorado up to Pinedale, WY. We arrived at the Green River Lakes Trailhead and began hiking around 5pm. The 10ish miles we hiked that evening were a gentle climb on well-maintained trail up the stunning river valley. The horizon was filled with views of the mountains we'd be hiking through for the next week. A brief storm rolled in just after sunset, treating us to some fine alpenglow as we set up camp.

Continue Reading