Cinnamon Ginger Scones (gluten free)

scones

Scones! I used to make them every day as part of my job as a pastry chef, but it’s now been ages since I whipped up a batch. Probably because I’m not a huge sweets person. However, a scone-loving friend of mine recently had a birthday, so I decided to make a quick batch. After all, it’s always relaxing to spend time in the kitchen working with you hands (and to make treats for others!).

As always, my objective is to make healthy (or at least healthier) AND tasty baked goods. My old scone recipe wouldn’t do, so I went in search of new ideas.

The recipe I ended up using is based off of this one, with several modifications based on my preferences plus what I had on hand.

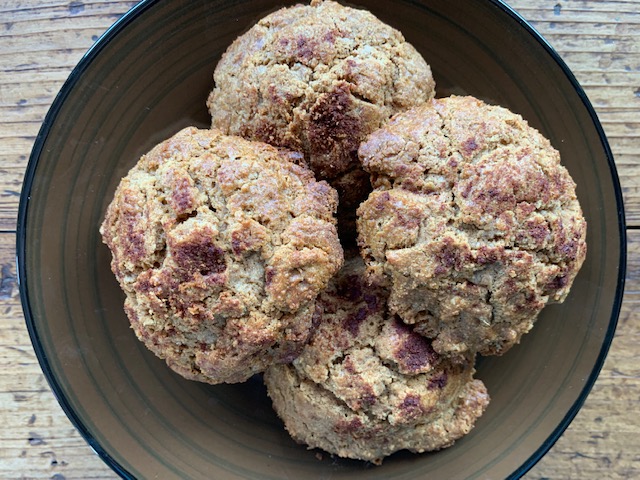
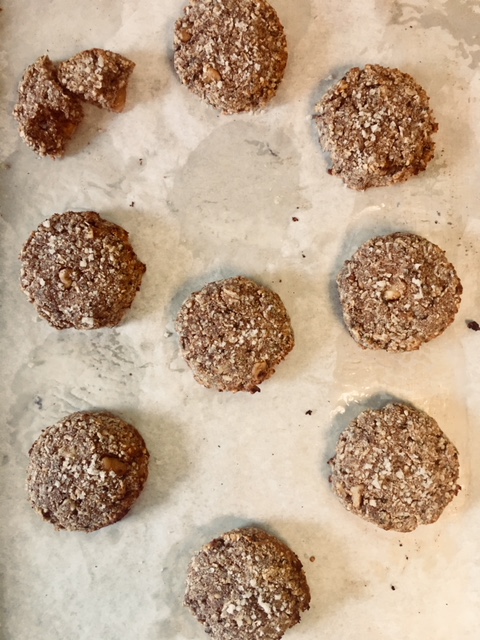
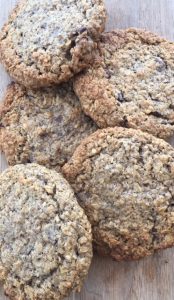
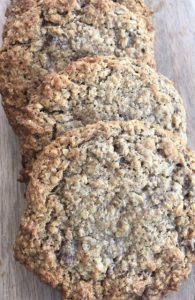
Ginger and cinnamon is a classic combination, anytime of year. These scones turned out buttery and delicious, with just a hint of sweetness. This is how a scone ought to be in my opinion 🙂

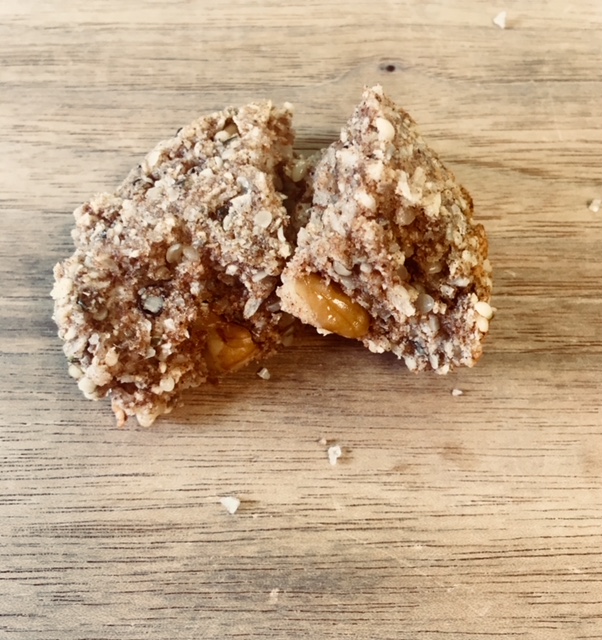
They were just a bit crumbly and could’ve used a little more of a ‘binder’ like arrowroot. Preparing them in a food processor makes them super quick to whip up, even on a busy weekday morning. Plus, the ginger and cinnamon are anti-inflammatory-bonus!

Cinnamon Ginger Scones

Yield 8 scones

Prep Time 10 minutes

Cook Time 12 minutes

Ingredients

  • 1 cup oat flour
  • 1/4 cup potato starch (could also use arrowroot powder or tapioca starch)
  • 1 teaspoon cinnamon, plus more for sprinkling on top
  • 1/4 teaspoon baking soda
  • 1/4 teaspoon salt
  • 1 ounce fresh ginger root, peeled, chopped into chunks
  • 8 tablespoons grass-fed cold butter
  • 2 large eggs
  • 2 tablespoons molasses
  • turbinado sugar for sprinkling on top, optional

Instructions

  1. Preheat the oven to 400ºF and line a baking sheet with parchment paper.  
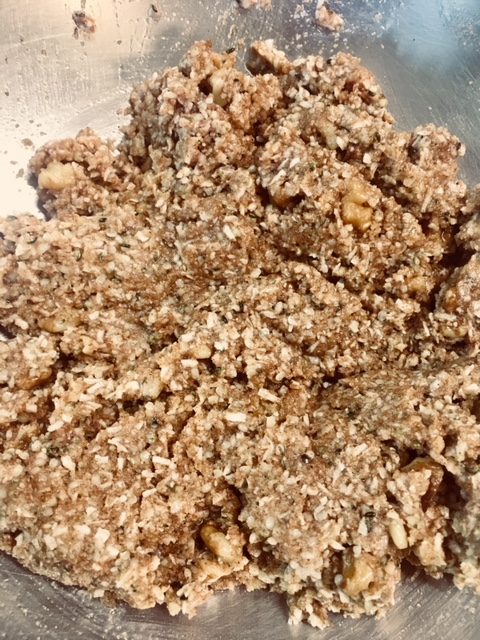
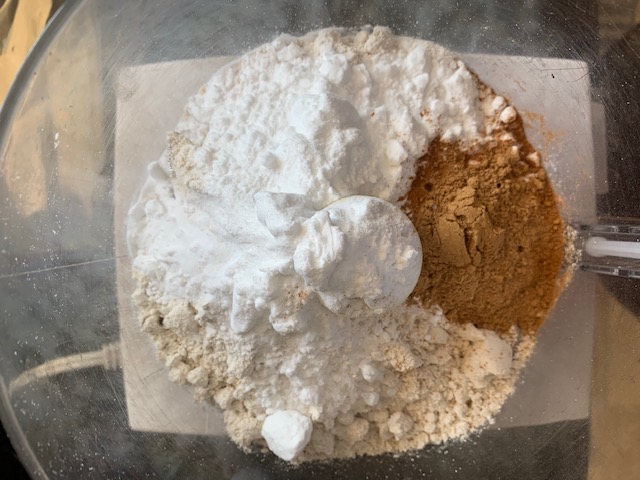
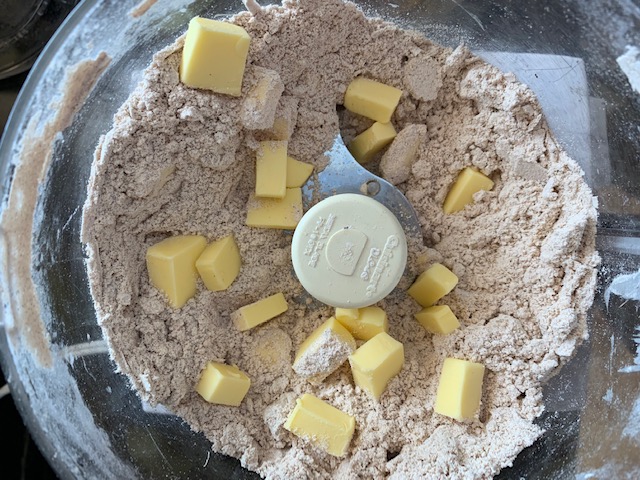
  2. Combine the oat flour, potato starch, cinnamon, baking soda, salt, and ginger in the food processor. Turn it on and process for about 30 seconds, until the ginger is minced and incorporated into the mixture.
  3. Add the butter and pulse for 10-15 seconds, so the mixture is the texture of coarse crumbs.
  4. In a medium bowl, whisk the eggs and molasses. Add the contents of the food processor to the bowl and mix until just incorporated.
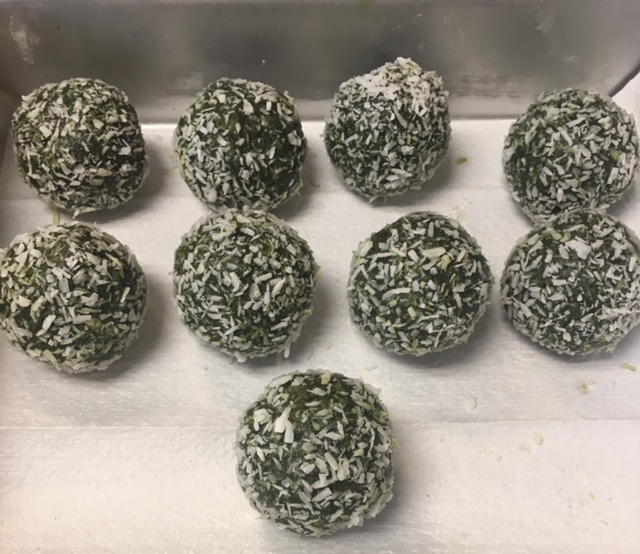
  5. To shape the scones: Flour your hands. Using a large cookie scoop or spoon, drop the dough into balls into the palm of your hand and gently press it into a flat ball.
  6. Sprinkle with turbinado sugar and/or cinnamon, if desired.
  7. Bake for 12-15 minutes, or until baked through and golden brown.
scones
scones

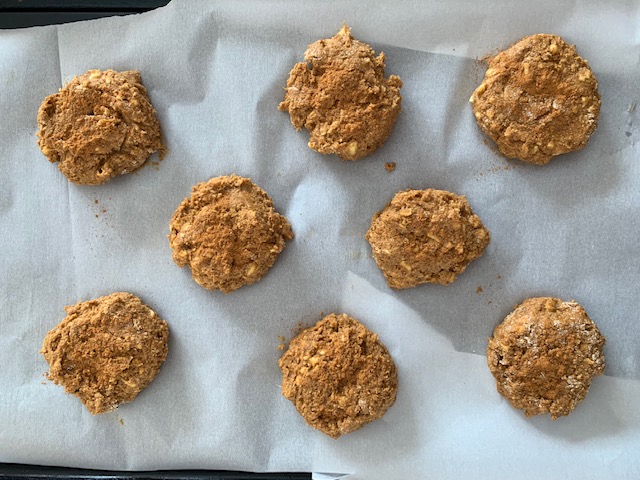
Simple, easy, delicious. Eat them plain or split in half and schmeared with a little almond butter. Enjoy!

Enjoy recipes like this? Click here to be the first to know when new posts are published!

scones

Herb Crackers

herb crackers

Easy Herb Crackers

(gluten free, grain free, paleo, vegan, refined sugar free…nothing but the good stuff)

Unless you’re new here, you may know that I have a strong affinity for salty, crunchy snacks. I’m always on the look-out for convenient foods that will make my body function optimally, and of course, snacks should be tasty.

Hit with a crunchy craving recently, I went rummaging through my cupboard and nary was a salty snack to be found. Not feeling like going to the store, it was time to get creative, and thus these Herb Crackers were born. They’re gluten free, grain free, vegan, contain no refined sugar, and are made up of few simple ingredients. They’re also ridiculously simple and result in a house filled with savory scents while they bake.

I’ve had a couple bags of tapioca flour in my freezer that a friend gifted me while I was on the Autoimmune Paleo diet as part of a protocol to heal my adrenal fatigue and hashimoto’s thyroiditis. Prior to these crackers, I hadn’t baked with tapioca flour, so I’d put off using it for over a year. Today was the day.

I searched online to generate ideas and inspiration for the basic cracker process and to see if there was anything special to know about baking with tapioca flour. Tapioca flour is the starch extracted from the cassava root, while cassava flour is the whole root. Generally, tapioca is well-tolerated and avoids causing an immune response, as happens with many other grains. Plus, it’s fairly neutral and lends itself well to taking on any flavor you want. However, it’s still a starch and will therefore raise insulin, so eat in moderation and pair these crackers with a fat and a protein.

These crackers are quick and easy to make, even if you’re not an experienced baker and  have never worked with alternative flours. They only have a handful of ingredients, most of which you likely already have. The tapioca flour could be swapped out for other fours like cassava, almond, or coconut.

In addition to making your house smell glorious, and being able to tailor the herbs to your personal preferences, another benefit of homemade crackers is that you don’t get the myriad of preservatives, food coloring, and additives that are often found in commercial baked goods. That alone makes it worth the little bit of effort it takes to whip up these savory little crunchies.

herb cracker

Easy Herb Crackers (grain free, gluten free, vegan)

Prep Time: 10 minutes

Cook Time:  55-60 minutes

Ingredients:

  • 1½ cups tapioca flour
  • ½ cup coconut flour
  • ½ teaspoon Himalayan salt
  • ½ teaspoon garlic powder
  • ½ teaspoon ground fennel seed
  • ½ teaspoon celery seed
  • 2 teaspoon basil
  • 2 teaspoon oregano
  • 1 teaspoon tomato powder
  • ½ teaspoon baking powder
  • 6 tablespoons extra virgin olive oil
  • 8 tablespoons filtered water

Preparation:

Preheat oven to 300 degrees. Combine the dries in a mixing bowl. Feel free to use the combination of spices listed above, or create your own concoction. This is just what I had on hand. Add in olive oil and water. Combine thoroughly.

dough

Dough should be a somewhat sticky consistency, but it will stick together in a lump. It won’t be overly loose nor will it be so dry that it doesn’t stick together. You should be able to hold it without it falling through your fingers. Add more flour and/or liquid to adjust consistency as necessary.

crackers

Dump the dough onto a piece of parchment, flatten it into a rough rectangle with your hands, and place another piece of parchment over it. Smooth dough and press into an even 1/4″ rectangle(ish) with a rolling pin. Remove the top piece of parchment and pull the bottom piece onto a baking sheet.

crackers

Bake at 300 degrees for 30 minutes. Remove from oven and use a pizza wheel or knife to cut the dough into roughly 1 inch squares. Return squares to baking sheet with some space in between each. Bake another 25-30 minutes until golden brown and lightly crisp.

Cool completely and store in airtight containers. Enjoy with soup, nut butter, hummus, cheese or cured meat. 

Enjoy this recipe? Comment below and click here to be added to our newsletter to be the first to know when new posts come out!

Pumpkin Oatmeal Cookies (gf)

autumn cookies

Pumpkin Oatmeal Cookies aka Autumnal Equinox Cookies

Sweaters, fuzzy slippers, flannel pajamas, golden leaves, and cozy evenings by the fire. Ahh, fall. The season for hygge.  In my book, the autumnal equinox is the mark for when it’s officially time to start baking with pumpkin again and roasting root veggies on the daily.

After finishing my hike of the Oregon Desert Trail at the end of September, I returned to my hiking partner’s house in Portland for a couple of weeks. As often happens when I’m on trail, I missed preparing food. Real food. There’s something about chopping, mixing, and combining beautiful ingredients that is so tactile and enjoyable.

As it’s wont to do in Portland in the fall, the weather cooled down and the skies clouded over. The cool rainy weather coupled with a dinner party in honor of my hosts’ 15th wedding anniversary meant some baking was in order.

We kept it casual with roasted veggies, grilled fish, and the following fall-flavored cookies. These cookies are naturally gluten free, and can be made dairy free by substituting the butter for coconut oil. They can be made free of refined sugar by swapping the brown sugar for coconut sugar. They can be made vegan by swapping the eggs for flax eggs (1 egg=mix 1 tablespoon ground flaxseed meal + 3 Tablespoons water & allow to sit for 15+ minutes).

oatmeal pumpkin cookie

Pumpkin Oatmeal Cookies

Makes ~15 small cookies

Ingredients

3/4 cup light brown sugar

5 Tbl butter, melted, cool

2 eggs

1 tsp vanilla extract

1/2 cup organic pure pumpkin puree

1 cup organic rolled oats

1.5 cups oat flour (I grind rolled oats in a coffee grinder)

1/2 tsp baking soda

1/2 teaspoon salt

2 tsp pumpkin pie spice

1/2 tsp ground ginger

3/4 cup add-ins (chopped walnuts or almonds, pumpkin seeds, raisins, cranberries, chocolate chips, etc.

Cream the butter and the sugar together until light and fluffy. Mix in the pumpkin, eggs, and vanilla until evenly combined. Mix all dries together in a separate bowl then slowly add to wets, mixing until well combined. Add in whatever ‘add-ins’ sound good to you.

Form into small (golf ball size) balls on parchment-lined baking sheet. Press flat. Bake at 350* for 12-14 minutes.

Enjoy 🙂

pumpkin

Want more recipes like this? Search the ‘recipes’ category on this site, and sign up here to be the first to know when new posts get published. 

Coconut Walnut Cookies

coconut walnut cookies

I don’t eat many cookies, but when I do, I’m looking for high fat, low sugar snacks that pack well for long days in the mountains.

I’ve been hiking 14ers a lot on the weekends this summer and keeping a batch of these coconut walnut cookies in the freezer has been key to getting me out the door quickly with healthy fuel in tow. I throw a few of these in my food bag, along with some nuts, and I’m out the door. I like knowing that I have a clean, home-made snack that’s going to fuel me for the day. No more processed, sugary, chewy bars.

coconut walnut cookies

These cookies can be whipped up in about 30 minutes, including bake time, and they are gluten free and dairy free. The high fat content keeps me satiated on long hikes.

They are definitely less sweet than your average cookie, having just a hint of sweetness from the honey. In addition to the high fat content, the cinnamon also adds a blood sugar balancing effect. The sea salt on top replaces minerals lost through sweat and, well, it just tastes delicious. I like to have big chunks of walnuts in mine, but you could grind the walnuts to a finer consistency. Alternatively, you could substitute other nuts or seeds there.

I believe I found the original version of these on a keto forum and then adjusted it to suit my needs. If anyone knows the original source, please feel free to comment below.

coconut walnut cookie

Coconut Walnut Cookies

1/3 cup hemp seeds

1/2 cup shredded coconut, unsweetened

3 large eggs

1/2 cup coconut flour (or almond flour)

1/4 cup coconut oil, melted (or ghee or grass-fed butter)

2 teaspoons cinnamon (or pumpkin pie spice mix)

1/2 cup walnuts, toasted, chopped

1/8 teaspoon himalayan salt

1/8 cup honey

Mix all ingredients together in mixing bowl. Portion 1-2 Tablespoon size balls onto a parchment-lined cookie sheet. Top with coarse sea salt.

Bake at 325*F for 12-15 minutes, until lightly golden brown.

cookie batter

cookies

Paleo Granola

trail

This granola is super simple to make. It’s quick (less than an hour including bake time) and the ingredients are easy to find in any supermarket.  A little bit keeps me satisfied and full of energy for a long day in the mountains.

I like to make a batch of this to have on hand as an easy on-the-go snack for long day hikes and backpacking trips. It’s full of healthy fats and protein. It’s free of gluten, grains, dairy, and refined sugar. It’s calorie-dense, healthy, and delicious. Plus, it’s easy to omit or swap out ingredients depending on what’s in your kitchen!

granola

Paleo Granola

*free of gluten, grains, dairy, refined sugar

1 cup (4.5 oz) chopped pecans
3 cups (6 oz) coarse coconut flakes
1.5 ( 6 oz) cups sliced almonds
1 cup (6oz) pumpkin seeds
1/2 cup (4 oz) sesame seeds
1/2 cup (3 oz) sunflower seeds
1/8 cup (0.75 oz) chia seeds
1/4 cup (1 oz) hemp hearts
1 tsp sea salt (Pink Himalayan is my favorite)
1 tablespoon pumpkin pie spice (blend of nutmeg, cinnamon, ginger, nutmeg, allspice, cloves)

1/2 cup (4 oz) grass-fed butter (or olive oil or coconut oil)
1/2 cup (6.5 oz) honey

Mix all the dries together. Melt honey and butter, and mix into dries. Spread onto parchment lined cookie sheet.

Bake 25 min at 300 or until lightly golden brown. Be careful not to overbake! This can happen quickly.

Allow granola to cool,  and break into clusters of whatever size you like. Add in dried fruit, such as blueberries or cranberries, if desired.

Store in glass jar at room temp for up to 10 days.

Yum!

granola

Like what you’re reading? Sign up here to be the first to know when new posts come out!

Coconut Maca Energy Bites

maca bites

I recently prepared an unusual resupply box for a friend who is currently thru-hiking. This was not your average resupply box full of ramen, snickers, and pop-tarts though. This box focused on performance-enhancing ingredients. He’s nearing the end of a 2200-ish mile route, so his body is getting tired. His primary concerns are enhancing recovery and optimizing sleep. These maca coconut energy bites were a key component of the goodies I sent him.

Food is always the first line when it comes to optimizing performance. However, during a demanding endeavor, such as a thru-hike, supplementation can certainly support the mind and body in performing better.

There are many supplements that came to mind when I began brainstorming around endurance, recovery, and sleep. Note: Since I am not a doctor, I don’t prescribe, treat, or diagnose. However, I do know what I’ve seen work for myself and others in the past.

I included several items in the box, but an area I focused on in particular was a class of herbs called adaptogens. Adaptogens have become one of those buzz words in the holistic health space as of late, but they’ve been studied since the 1960s and herbalists have used them for decades. Simply put, adaptogens aid the body in adapting to stress. From the journal Pharmaceuticals, “studies on animals and isolated neuronal cells have revealed that adaptogens exhibit neuroprotective, anti-fatigue, antidepressive, anxiolytic, nootropic and CNS stimulating activity.”

In addition to an adaptogen tincture I included in his box, I was also interested in including Maca root (Lepidium Peruvianum Chacon). While more clinical trials are needed, Maca has a long history of traditional use. It’s a Peruvian staple food grown in the harsh, high plateaus of the Andes. It’s been used to improve stamina and endurance, balance hormones, and improve immunity. It’s also believed to be an aphrodisiac and improve libido. Due to these properties, many consider Maca to be an adaptogen.

Maca can be purchased in powder form and lends itself easily to including into foods. It has a pleasing nutty flavor, and it’s packed with vitamins and minerals, so it boosts the nutrition of any food to which it’s added.

These bites were designed to be energy-dense and durable. They are a convenient and tasty way to get in nutrient-packed maca, as well as healthy fats from the hemp hearts, coconut oil, and walnuts. The dates provide sweetness and quick energy. Due to the fats, protein, and fiber, they’ll boost your energy without the sugar crash afterwards.

Maca Coconut Energy Bites

Makes 11x30g bites

  • 1 cup pitted medjool dates
  • 1/2 cup walnuts
  • 1/2 cup hemp hearts
  • 1/2 cup dried unsweetened coconut
  • 2 tbsp organic maca powder
  • 1 Tbl coconut oil
  • 1/4 tsp sea salt
  • 1 Tbl cacao powder
  • 1 tsp vanilla extract

Blend all ingredients in a food processor until mixture is well blended and creates a soft dough. If dough is not coming together, add a bit more oil or a tiny bit of water.

maca bites

Roll dough into 30 gram balls (a hefty tablespoon), roll them in coconut and put into an air tight container. Store in the freezer until you’re ready to eat.

Like what you’re reading? Sign up here to be the first to know when new posts come out.

maca bites

Simple Sauerkraut

New research is coming out daily about the impact of gut health on almost every aspect of human health, from immune function to mood and brain health. A PubMed search for “microbiome” (the term used to describe the collection of 100 trillion bacterial cells that inhabit our bodies) returns over 60,000 results!

Needless to say, our gut bacteria play an important role in our health. and keeping a healthy population and diversity of the right bugs is key to optimal performance in every area of your life.

One of the best ways to support a healthy microbiome is to include both prebiotic and probiotic foods in your diet. Prebiotics are the food that feed the good bacteria. Probiotics are the good bacteria themselves.

Put quite simply, foods high in fiber are good prebiotoics (think fruits and veggies). Examples of probiotic-containing foods include fermented and cultured foods such as kimchi, yogurt, kefir, miso, and the focus of today’s post: sauerkraut.

If you’ve never heard of the microbiome, including gut-healthy foods may feel intimidating to you. But, fear not!

It can be incredibly simple, tasty, and affordable.

While you can purchase your fermented foods at the grocery store, you can save money by making your own ferments at home. An easy place to start is with sauerkraut.

Below is a basic recipe from which you can create many variations!

Simple Sauerkraut

Ingredients

  • 1 large head green or red cabbage
  • 1/8 cup sea salt
  • Water

Directions

  1. Cut the cabbage in quarters, cut out the stem, slice finely, and place into medium bowl.
  2. Sprinkle the salt over the cabbage.
  3. Squeeze the cabbage with your hands until it begins to break down and ‘wilt’.
  4. The cabbage will eventually begin to release liquid. When this happens, pack the cabbage into a clean Mason jar. Push the cabbage down hard to remove most of the extra space.
  5. Pour remainder brine from the bowl into the cabbage jar.
  6. Be sure to submerge the cabbage below the liquid.
  7. If there is not enough liquid, add salt water until the cabbage is completely covered. To do this, mix 1 cup of water with 1 teaspoon sea salt.
  8. LOOSELY place the cap on the mason jar, but do not tighten it.
  9. Keep jar at room temperature, out of direct sunlight. (e.g. on a counter top).
  10. For the first few days, check on the cabbage and add extra liquid to keep the cabbage submerged. A bit of white foaminess is normal. However, be on the lookout for anything that looks or smells moldy.
  11. Taste the cabbage after 6-7 days. It should be tangy, but will probably still be quite crisp. Speed of fermentation depends on the ambient temperature  in your home.
  12. Ferment your kraut until taste and texture meet your preferences. I like to ferment mine about 10 days.  At this point, cap the jar and store in the refriegerator.
  13. Enjoy a dollop daily with meals!

For variations, I add different spices, such as caraway seeds or peppercorns. You can use this same method to create kimchi or ferment any other vegetable easily at home!

Five Herbs for Liver Health & Detoxification Support

crocus spring detox

The crocuses and dandelions are popping out of the ground, and the days are getting longer. After a season spent mostly indoors, our bodies yearn for sunlight, movement, and fresh food. Spring is an ideal time to give your body a reboot by optimizing detoxification.

A great way to enhance your body’s natural detoxification system is to support the function of your liver. The liver filters blood coming from the digestive tract before sending it to the rest of the body. It detoxifies chemicals and metabolizes drugs. Among other metabolic processes, the liver produces bile, which breaks down fat into fatty acids to produce energy. Liver health is also essential for healthy hormones.

Align with the seasons and move into spring feeling fresh and energetic by including these 5 liver-supporting herbs into your day.

dandelion

Dandelion Root (Taraxacum officinale)

Dandelions support the digestive system by maintaining a proper flow of bile. Dandelion root also has a natural diuretic effect, allowing the body to eliminate more toxins. Dandelion tea is a great substitute for coffee while cleansing the liver.


milk thistle

Milk Thistle Seed (Silybum marianum)

Milk Thistle contains a flavonoid called Silymarin, which has antioxidant and anti-inflammatory properties. Silymarin has been found to increase glutathione (an antioxidant necessary for detoxification), and it may also support the regeneration of liver cells.


yellow dock root
photo courtesy urbol.com

Yellow Dock Root (Rumex crispus)

Yellow Dock aids in detoxification by increasing bile production. It also supports elimination and removal of toxins by stimulating bowel movements and increasing frequency of urination.


turmeric root
photo courtesy specialtyproduce.com

Turmeric Root (Curcuma longa)

Besides the well known anti-inflammatory effects of turmeric, recent research has shown that curcumin, the primary polyphenol in turmeric, may have liver-protective and regenerative properties for damaged livers.


licorice root
photo courtesy magicalbutter.com

Licorice Root (Glycyrrhiza glabra)

Recent studies indicate that Glycyrrhizic acid, a key active constituent in licorice root, has anti-inflammatory and immune regulatory actions. It also has antiviral effects, antitumor effects and has been shown to inhibit premature cell death of liver cells. As an adaptogenic herb, licorice can support the overall functioning of the body during detoxification.

Spring Detox Decoction

2 parts licorice root

2 part dandelion root

1 part ginger root

1 part cinnamon bark

When working with hard, woody parts of the plant, such as these liver-supporting roots, use a decoction to extract the active compounds. Use 1 cup water per tablespoon of herbs. Place herbs and cold water into a saucepan and bring to a simmer for 20-40 minutes. Cool and strain. Store in a sealed glass container in the refrigerator for up to 48 hours.

As we move into spring, consider consuming more water, getting outside for sun and movement, and giving your body a rest by cutting out gluten, dairy, sugar, alcohol, and caffeine for 30 days.

Matcha Energy Bites

matcha energy bites

What to do on a snowy Colorado day (after going out to play in the snow)?

Play in the kitchen, of course!

I was craving vibrant colors, so in addition to trays upon tray of roasted veggies (meal prep for the week), and starting a new batch of purple cabbage & fennel kraut (yay fermented foods!), I whipped up these matcha energy bites.

They’re a delicious snack to have on hand when you’re craving a little something sweet in the afternoons, and they’ll definitely treat you better than a handful of candy and a latte.  They’re also easily portable, so they’re great for taking on a long run, ride or hike.

The carbs are good for immediate energy and the healthy fat and protein will keep you going through your afternoon at the office or your day in the mountains. Note: Matcha is a type of green tea and does contain a small amount of caffeine, so if you’re highly sensitive, avoid these in the afternoon or evening.

These bites are vegan, gluten free, and grain free. They don’t require baking and they’re quick to whip up with nothing but a food processor. Plus, these portable little energy bundles contain just 6 real food ingredients!

Oh, I almost forgot! The benefits of Matcha? It’s packed with antioxidants to help fight inflammation, it’s loaded with EGCg (a compound with cancer-fighting properties), it contains L-theanine (which enhances calm and increases focus and memory), and it supports a strong immune system, among so many other benefits!

matcha energy bites

Match Energy Bites

Makes 10 bites @ 35-40 grams each

Ingredients

1.5 Tablespoons Matcha Powder

1.5 Tablespoons honey

4 Tablespoons almond flour

1 dash of cinnamon (optional)

2 Tablespoons coconut oil, melted

1 Cup coconut flakes, unsweetened, finely shredded (plus coconut to coat outsides)

110 grams Medjool dates, pitted


matcha bites

Put all ingredients, except the coconut oil and dates into the bowl of the food processor. Process the mixture for 30 seconds to a minute, until well combined. Add dates, one a time, through lid, while processor is running. While processor continues to run, pour in coconut oil through the lid. Allow mixture to blend thoroughly, 30 seconds to a minute. Remove lid and dump contents into a bowl.

matcha bites

Add half a cup of coconut flakes to a separate bowl. Either with or without a scale, measure out chunks of ‘dough’ about the size of a golf ball, or 35-40 grams each. Roll into a ball, toss the ball in the coconut flakes to coat, and place on a napkin lined tray.

All done!

matcha bites

Transfer to an airtight container and store in fridge up to a week or in the freezer for longer.

Grab one the next time you head out the door and never be caught again without a healthy snack on hand!

Oatmeal Chocolate Chia Cookies

There’s truly nothing better than the smell of toasting oats. Except maybe these cookies baking. With the added scents of cinnamon and chocolate in this recipe, the smell of these cookies fresh out of the oven fills a home and a heart with happiness.

oatmeal chia cookie

This recipe was another experiment in making a slightly healthier version of an old staple. It contains sugar, so it’s still meant to be a treat, but with the added fiber from the extra dose of oats, and the healthy Omega-3 fatty acids from chia seeds, this version of the classic oatmeal chocolate cookie at least has a few redeeming qualities.

The chia seeds are ground (I used a coffee grinder) to increase the surface area. This makes them more bio-available to the body, and once moisture is added to the dough, forms a gel to hold the cookies together since they lack gluten.

If you look back at my Hemp Cocoa cookies, my goal when creating gluten free cookies is to not use other grain mixes, and to come up with a version that tastes as good or better than the original, has a better nutrition profile, and just happens to be gluten free.

Oatmeal Chocolate Chia Cookies (gluten free)

10 ounces butter

5 ounces cane sugar

5 ounces brown sugar

2 teaspoon vanilla extract

3 eggs

10 ounces instant oats, toasted

12 ounces ground oats

2 ounces ground chia

1 teaspoon baking soda

2 teaspoons ground cinnamon

½ teaspoon salt

10 ounces semi sweet chocolate chips

Cream together butter and sugars. Mix in eggs and vanilla. Combine dries in a bowl and add to wets. Mix until well combined. Mix in chocolate chips. Allow dough to sit for 10 minutes before scooping with 2 ounce scoop. This allows time for the chia to become mucilaginous and holds the dough together better.  Flatten cookies into discs before baking. Bake 10 minutes at 325*F.

oatmeal choc chia cookie

Enjoy!