Sangre de Cristo Traverse Overview & Trip Report

In August of 2023, I hiked the ridgeline of the Sangre de Cristo mountains from Blanca Peak to Methodist Mountain. This is referred to as the Sangre de Cristo Traverse.

Though there are variations on the route, the primary Sangres Traverse runs along the central spine of the Northern Sangre de Cristo range, a subrange of the Rocky Mountains in Colorado. The main ridgeline traverses over 77 peaks, including five fourteeners and two thirteener centennials. It contains sections of extended class 3 hiking as well as class 4 and low fifth class scrambling. Depending on various factors, such as the weather or one’s comfort on technical terrain, alterations to the primary route can be made. 

This post provides an overview of the route as well as highlights from each day and the trip as a whole. It’s intended to be informative rather than instructional. Linked below are my gear list and food planning spreadsheet. If you don’t like reading, scroll to the bottom for 21 of my favorite photos from the trip.

Sangre de Cristo Traverse Overview

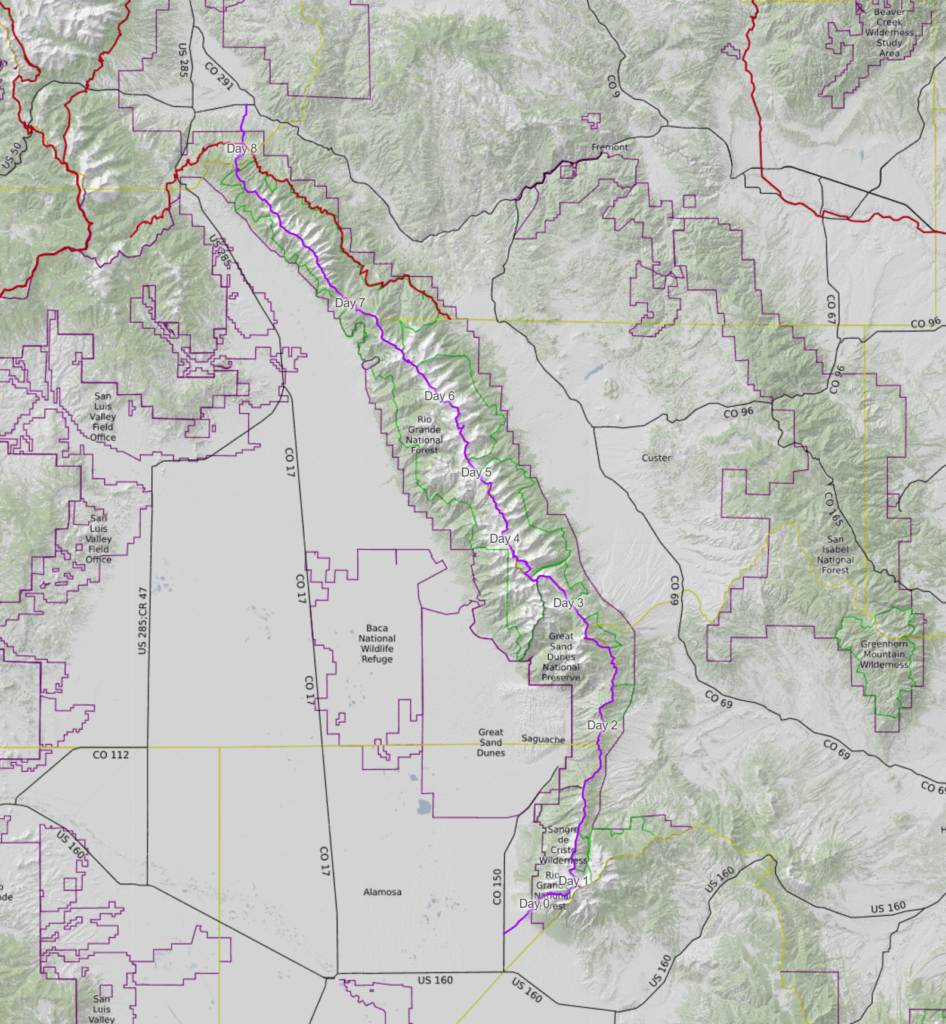
The route I completed covered 115 miles and 55,000 feet of vertical gain. These numbers include dropping off the primary ridge into basins for camp, water, and weather/technical detours. I was joined by Troy Klaassen and it took us 8 days to complete the route. We carried all of our food and gear from the start.

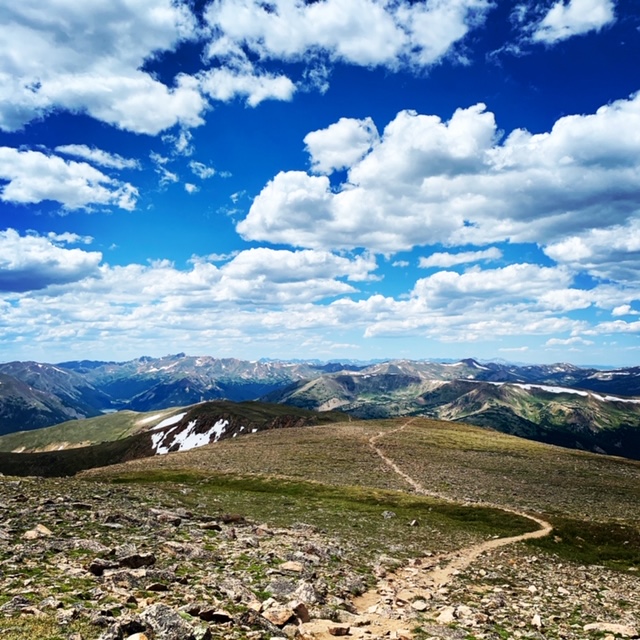
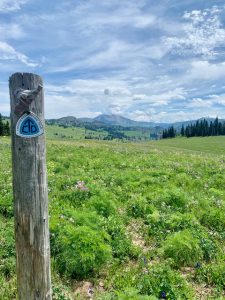
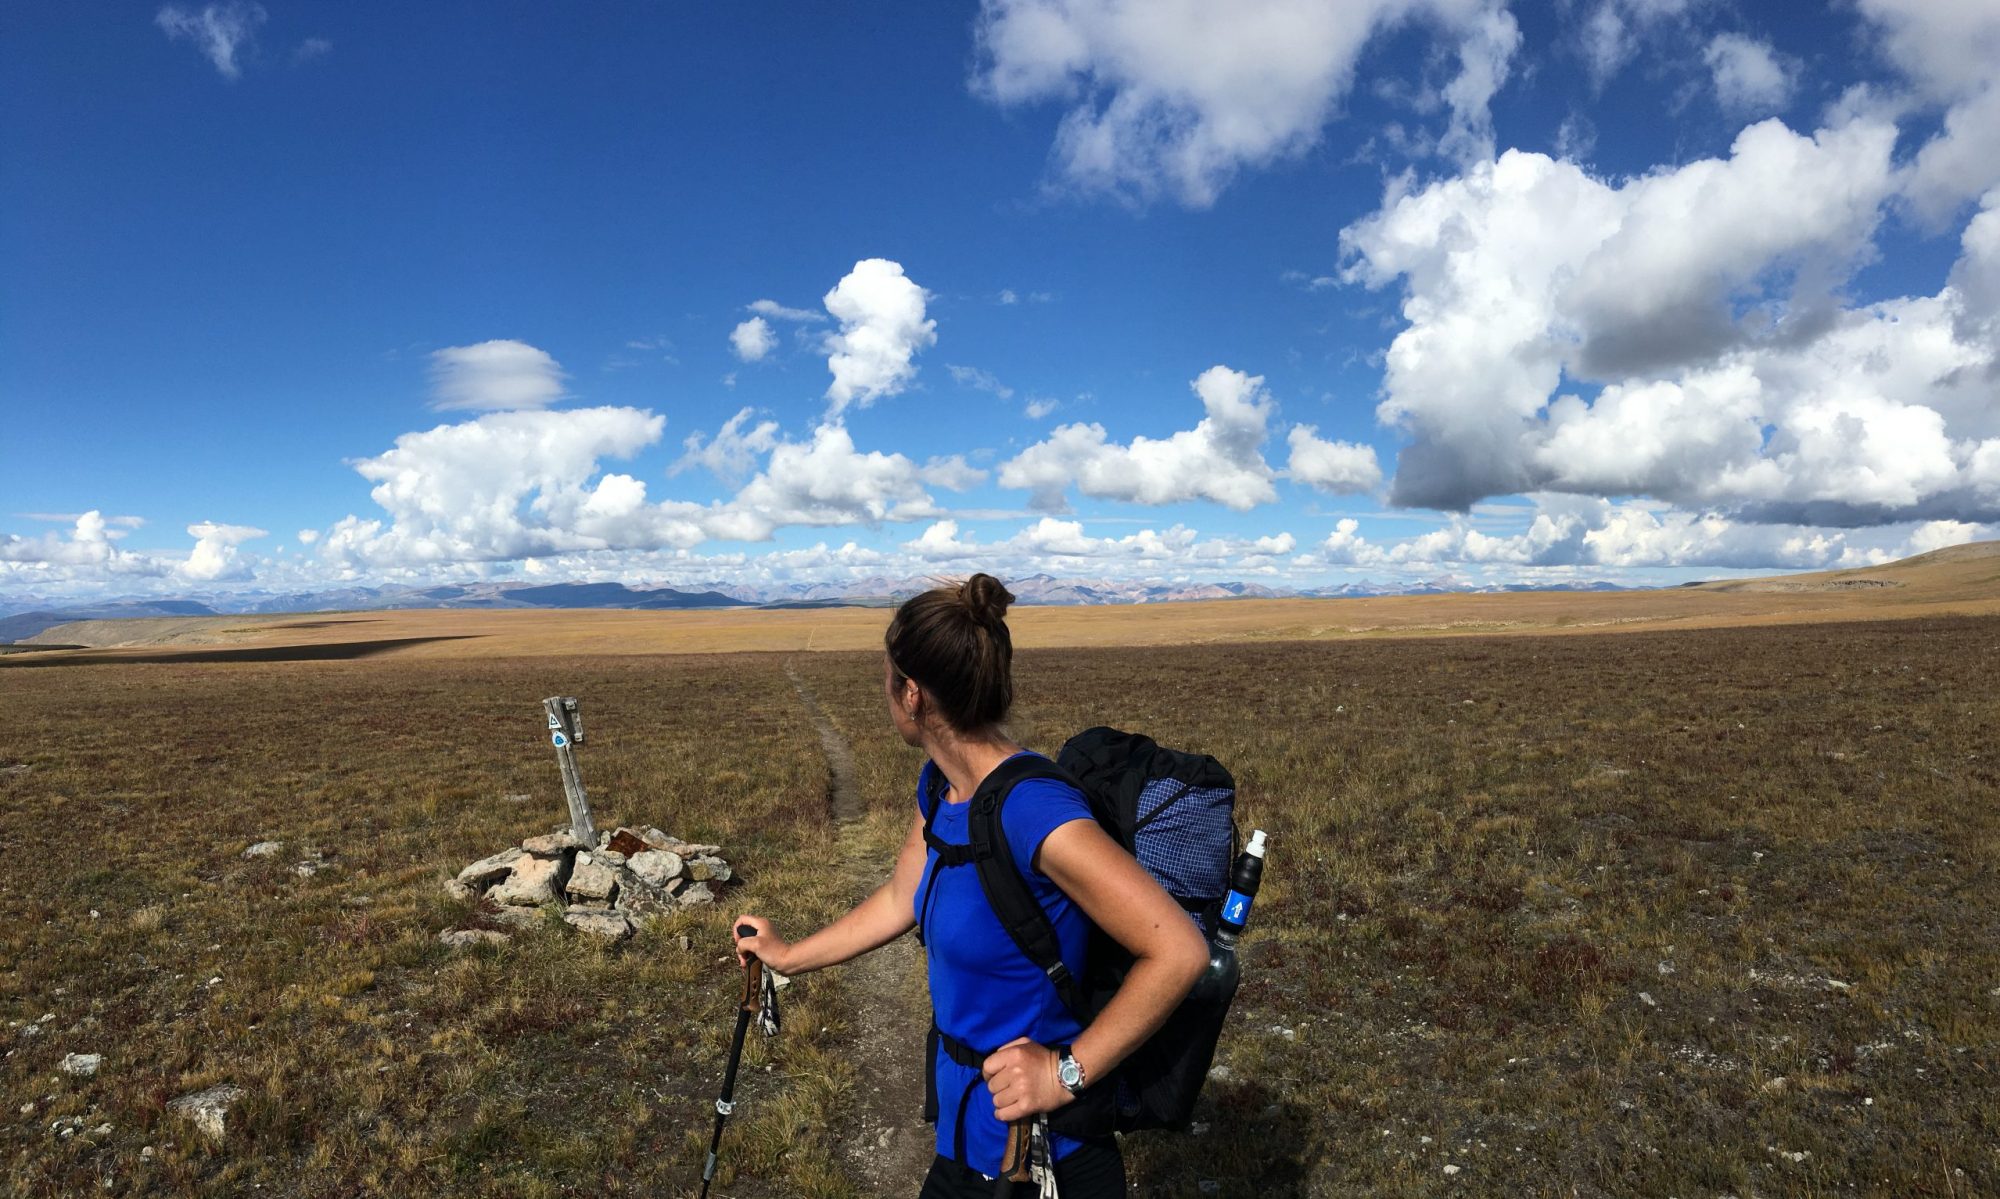
From Blanca Peak to Methodist Mountain, we followed less than 10 miles of established trail/road; instead hiking cross country and utilizing elk and sheep trails when we were lucky enough to find them. The majority of the travel occurred above treeline (~12,000’) where we were exposed to howling winds, intense sun, and rocky scrambles. Due to being on top of a ridge, there were no “on route” water sources and few opportunities to take cover if/when weather suddenly rolled in.

My goals going into this trip were to:

> Explore the Sangres on foot with the intention of developing a more intimate knowledge of and connection to the place I live

> Stretch and enhance my physical and mental capabilities (e.g. daily vertical accumulation, off-trail navigation and route finding, adaptability to rapidly changing circumstances, etc.)

> Connect a line on foot from the Highway 150/Lake Como Road intersection to Highway 50/CR 107 in Salida while staying true to the range’s central ridge as much as feasible

In preparation for completing this route, there were several resources that I found helpful and/or inspiring. These include Justin Simoni’s 2019 (south to north) and 2023 (north to south) trips, Hannah Green’s 2022 FKT, Nick Clark and Cam Cross’s 2018 FKT, and Brendon Leonard and Jim Harris’s 2013 backpack from Methodist to California. Additionally, a couple of long distance hikers I know, Cam “Swami” Honan and Alex “Pepperflake” McNaughton, have completed high route/traverses (separately) between Blanca and Methodist. From my understanding, the first attempt to traverse the range was by Bill Arnold, and Lester and Jim Michel in 1961 when they hiked from Poncha Pass to Music Pass.

Highlights & Takeaways

The entire trip was a highlight and as with any adventure, there were takeaways to be gleaned, but as I reflected on the trip in the weeks afterwards, there were a few themes that stood out.

The value of relationship to place. In researching and walking this route, I became infinitely more familiar with this range that I’ve lived by and recreated in for years. It felt special to connect many of my favorite local spots in one trip and to see from a new vantage point the peaks that I literally look at every day on my morning walk. That said, more than leaving me with a feeling of “been there, done that,” this trip revealed to me how much more there is to explore: so many subsidiary ridges, treed valleys, and alpine lakes.

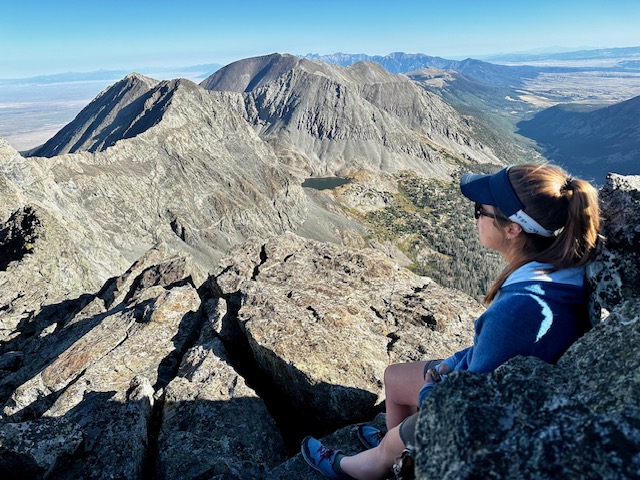
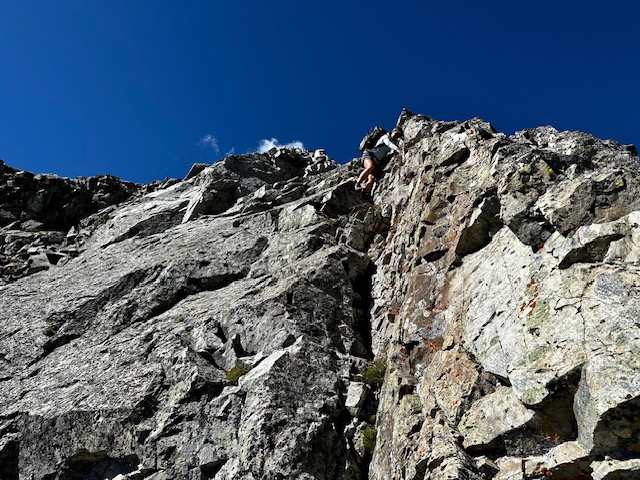
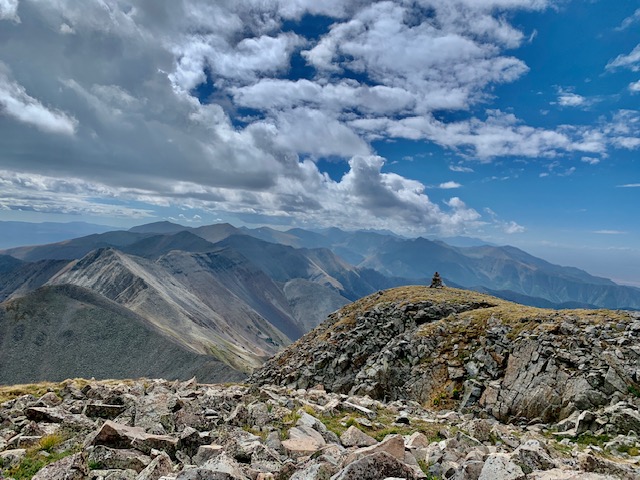
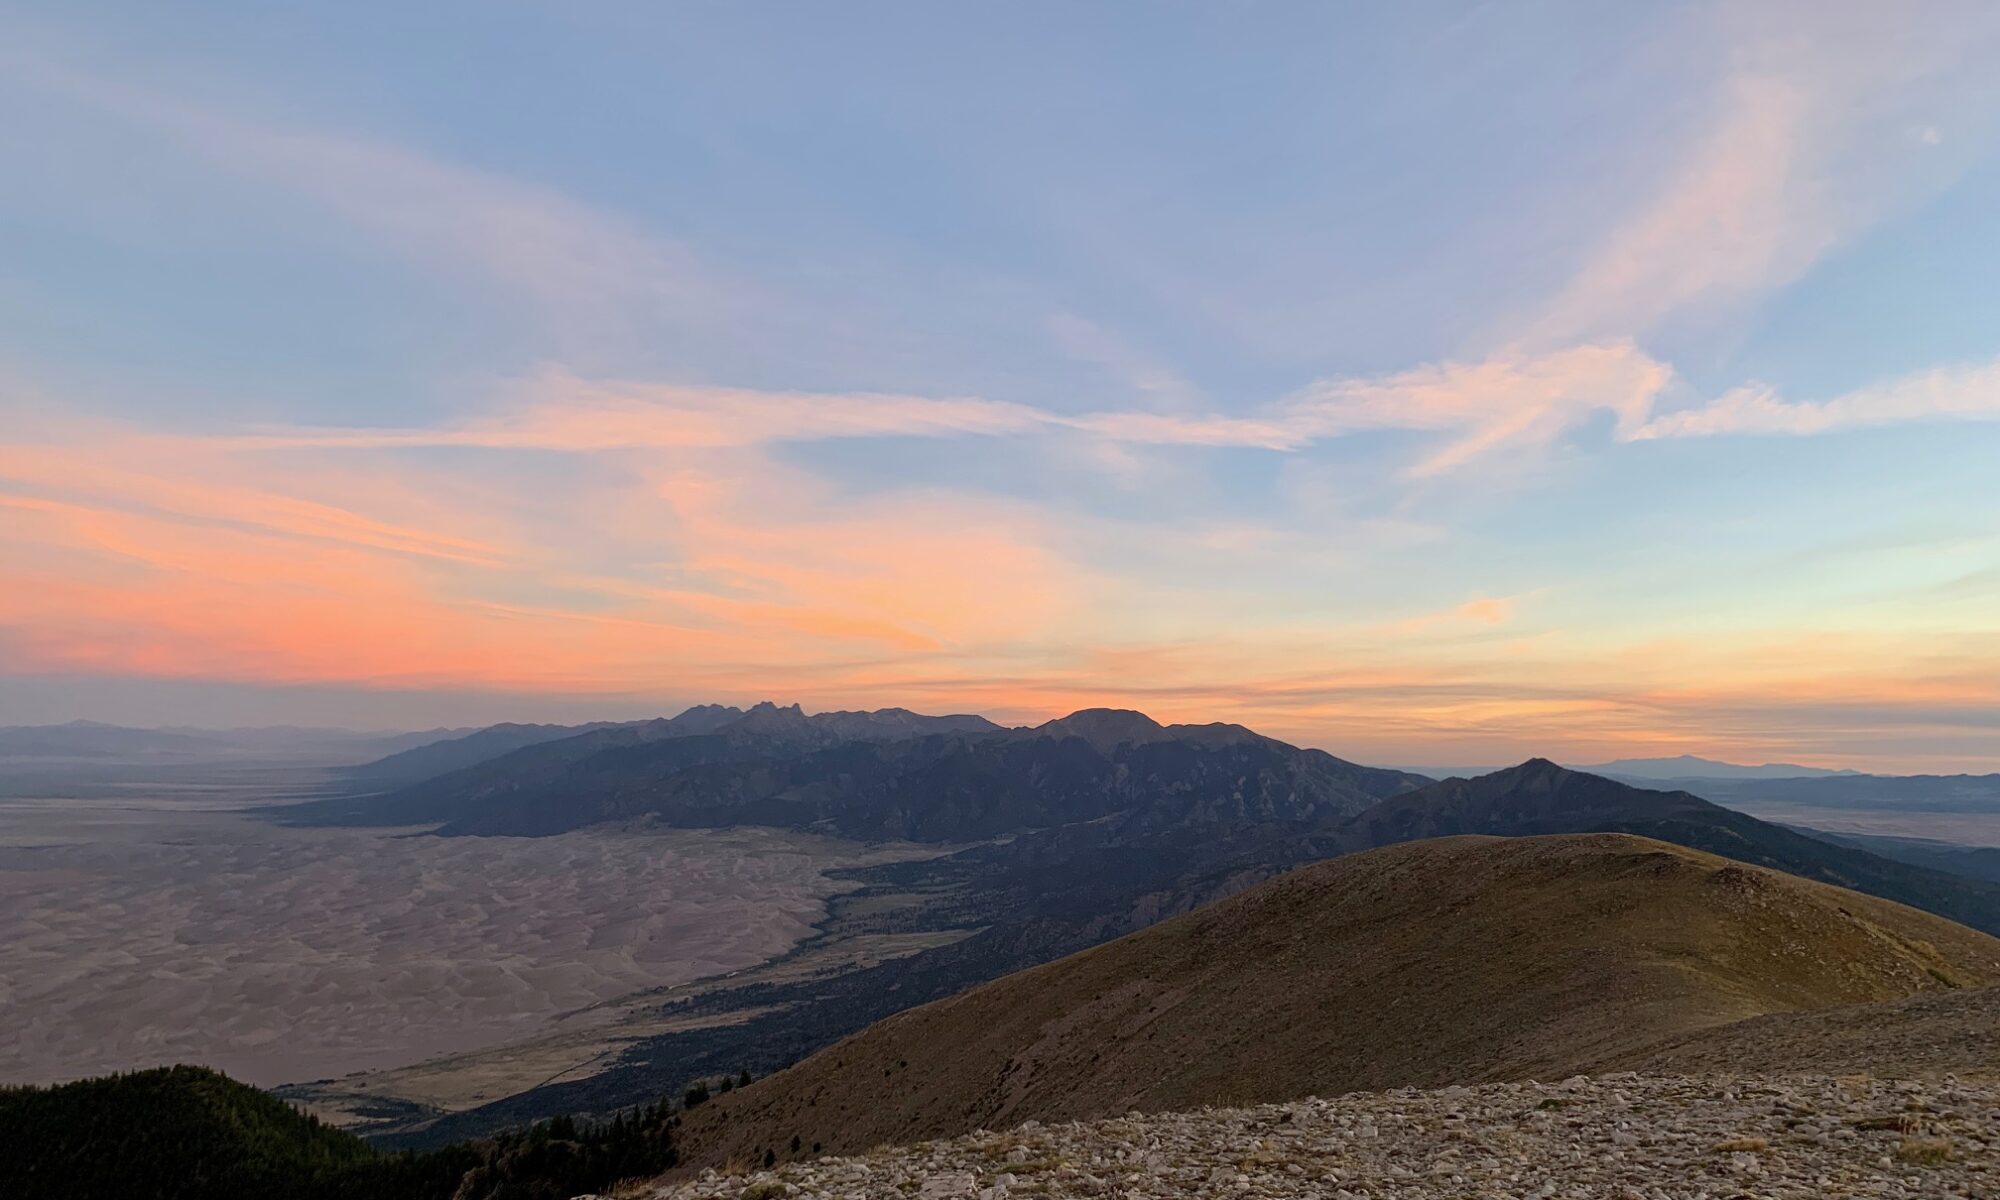
The diversity of the terrain and the natural beauty. Following one ridgeline probably sounds boring to a lot of people, but I found it endlessly enjoyable. I was surprised by the diversity in terrain from the technical class 4-5 sections of the Blanca and Crestone massifs to the many steep class 3 thirteeners that pepper the ridge, to the rolling tundra found farther north. The unique positioning of this range with the massive San Luis Valley (SLV) to the west and the Wet Mountain Valley to the east, and the ability to stare down the ridgeline to our farthest objective was awesome. The remote alpine basins and hidden tarns, the colorful sunrises, and the dramatic clouds that flowed over the ridge never got old.

The importance of a good partner. These types of trips (off-trail, remote, demanding, multi-day) are physically and mentally taxing, to put it lightly. You need to be out there with someone you trust, whose risk tolerance is similar to yours, whose fitness is on par with yours, and with whom you can communicate openly. Ideally, you’ve already been on many shorter outings with that person, you’ve vetted each other, and you know it works. When you’re out with a trusted partner, that can make the trip all the much better. The opposite is also true. This is a tenet I was already well aware of from my Great Basin hike and Grand Canyon Traverse with Ryan “Dirtmonger” Sylva. This trip reinforced the value of a good partner to me and spurred self reflection in both what I seek in a hiking partner as well as the ways I can be a better one to others. Our team work wasn’t perfect, but I’m appreciative to Troy for the ways he showed up as a solid partner during this trip and in the debrief afterwards.

Gear List

Find my complete gear list here.

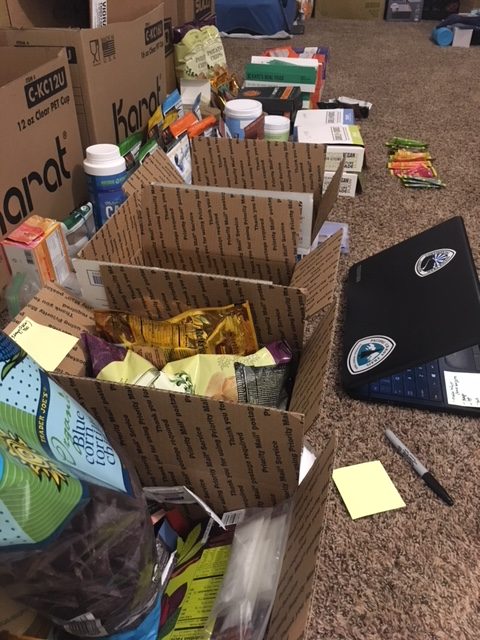
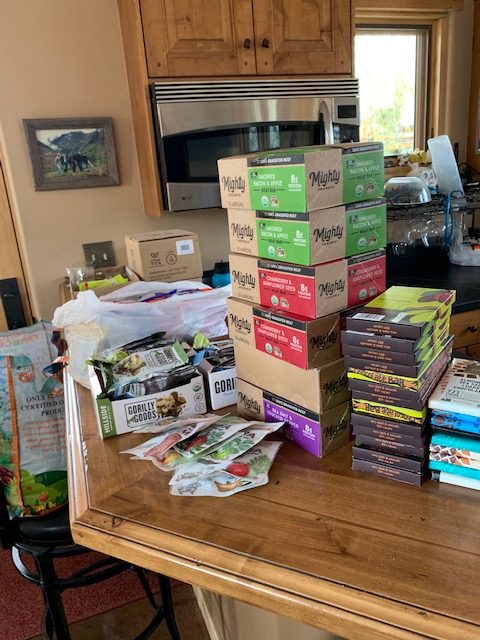
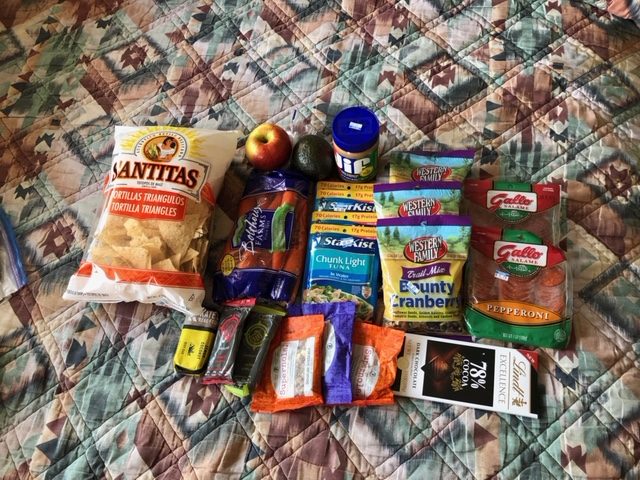
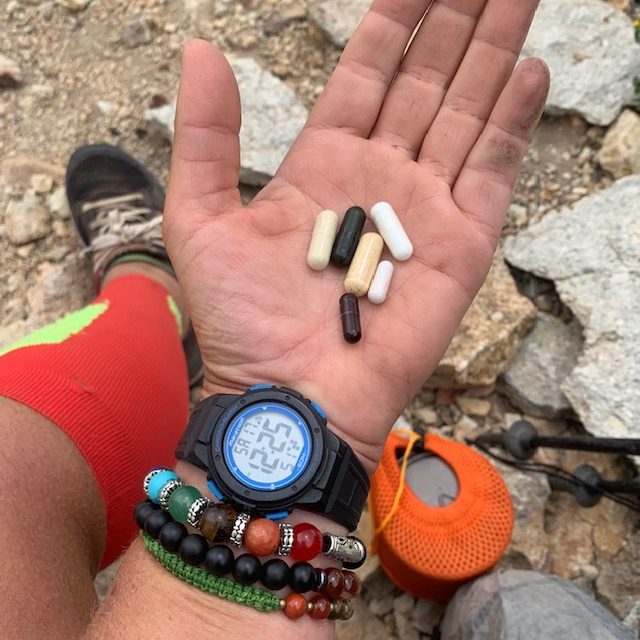
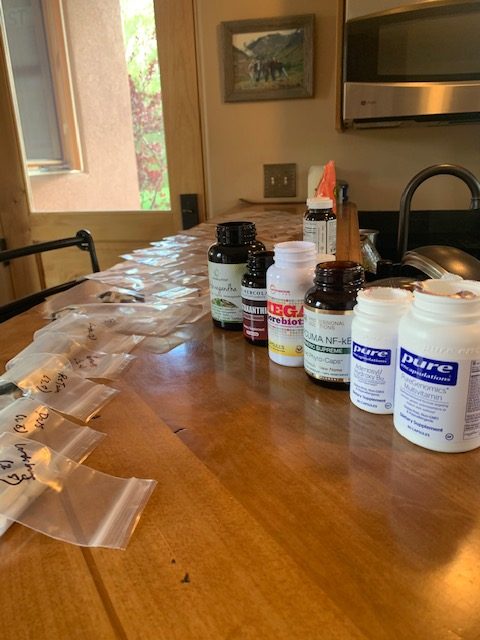
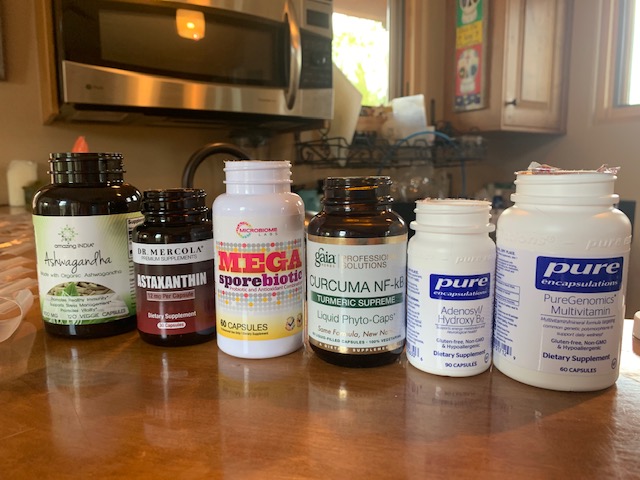
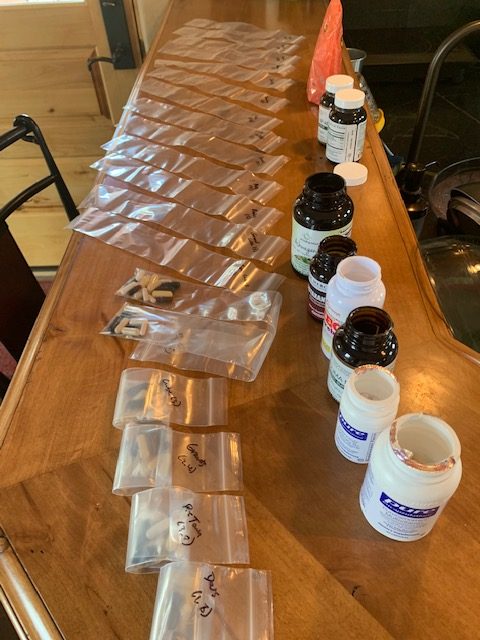
Nutrition & Food Planning

Read about my food planning and nutrition here.

Day by Day

Day Zero

Around 1pm, we leave Troy’s truck at the dirt lot that marks the junction of Lake Como Road and Highway 150. It’s finally time to start this thing. 

I’m a bundle of nerves and excitement. 

I’ve been considering walking this range for years. It’s hard not to when you drive highway 17 through the San Luis Valley. The picturesque north-south ridgeline begs the question: could I traverse that whole thing on foot from end to end?

This range inhabits a special place in my heart and mind. I’ve lived on the north and south ends of the range, fallen in love on its flanks, had my heart broken here, buried my late cat under a Pinyon here, built lifelong friendships here, completed my 14ers here, and driven around these peaks more times than I can count. If there’s any place that’s felt like home in my adult life, it’s these mountains.

It’s 85 degrees on the hot, exposed, dusty 4wd road that we must walk up to access the main spine of the ridge. Our packs are heavy with 8 days of food and a few liters of water. We’re both feeling a little nauseous from the heat and exertion. I also drank too much coffee this morning which isn’t helping matters. We rest in the shade of Pinyons, slowly making our way up the 4400 vertical feet towards our camp near the base of Blanca.

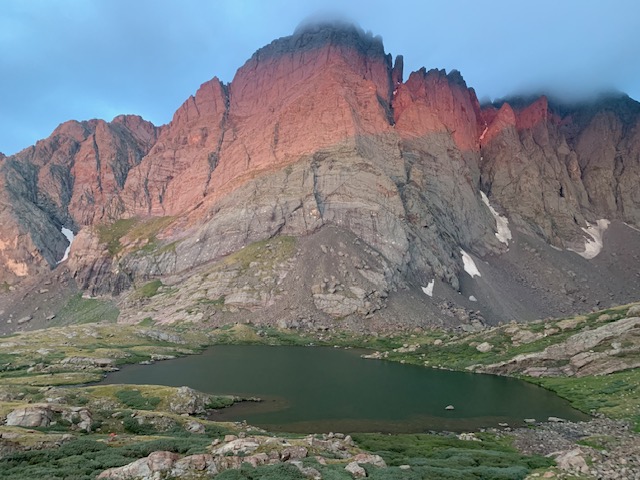
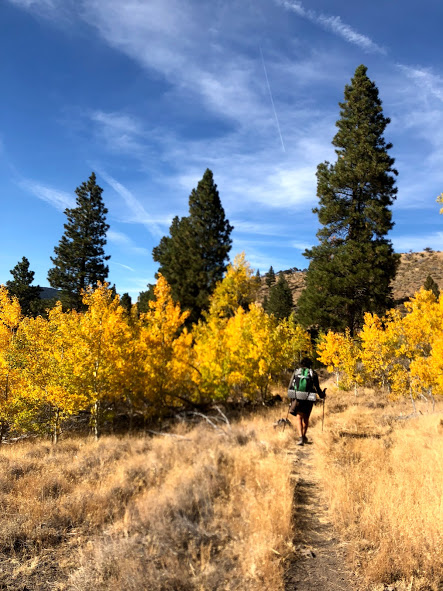
Golden aspen leaves on the trail tell me that the transition to fall has already begun in the high country. We hike past Lake Como and find a higher camp near Blue Lakes at 12,200’. The day’s heat subsides as we gather water, cook dinner, and discuss tomorrow’s plan. The basin’s three 14,000’ peaks (Little Bear, Blanca, and Ellingwood Point) loom above, tinged with alpenglow.

I go to sleep grateful to be out here after years of dreaming and months of planning. As with the start of any real adventure, I know challenging times are in store, but I don’t know exactly when they’ll arise and what form they’ll take.

Tomorrow the real work begins.

Sangre de Cristo Traverse Day 1

At 5:03 my alarm sounds and by 5:11,  I’m drinking coffee in the dark, watching the stars fade as dawn lights up the edges of the sky. 

By 6, we’re slogging up towards the Blanca-Ellingwood ridgeline To the west, the shadow of the Sangres is taking form on the floor of the expansive SLV. At the top of Blanca, we high five, “one down, seventy plus to go” I say. 

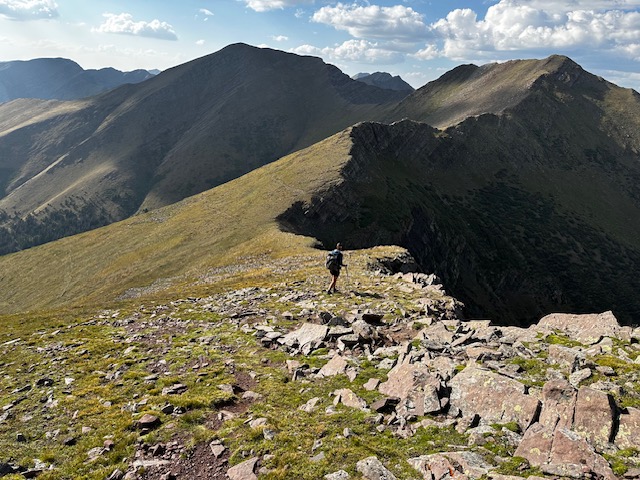
Being that it’s a Saturday, there are several other parties on the mountain, but after departing Ellingwood Point on the class 3 and 4 ridgeline over to California Peak, we don’t see another person until the end of the following day when we drop into the Great Sand Dunes Preserve for water. The weight of the full backpack makes the ridgeline scramble feel much more challenging than it did on a scouting mission 2 months ago.

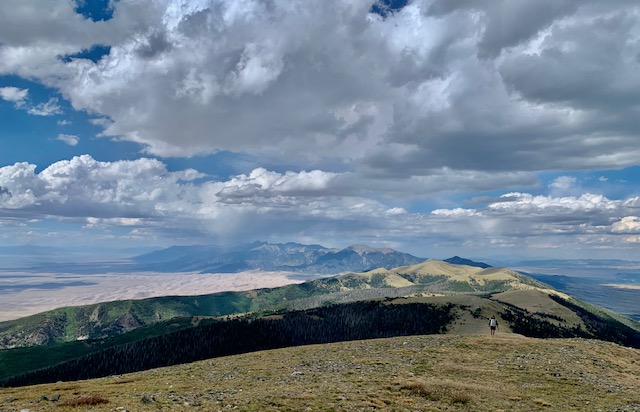
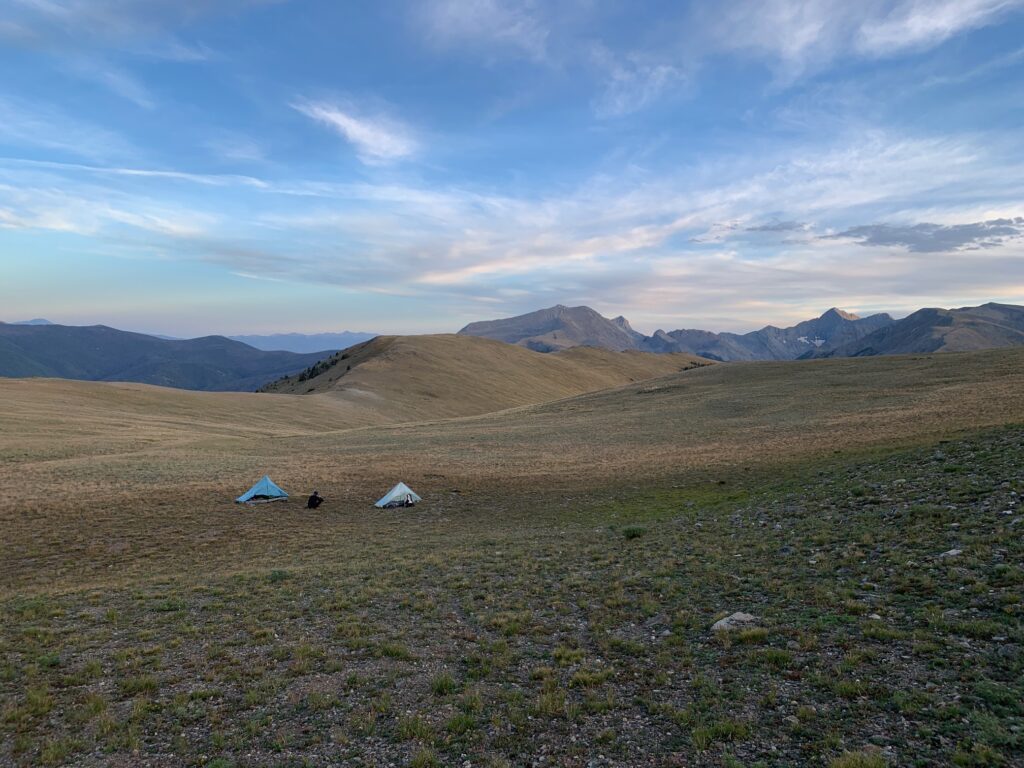
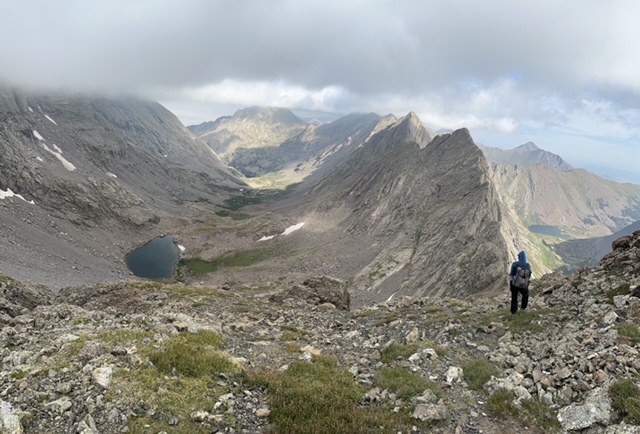
We drop north off California and the whole range – the entire following week’s work – is laid out in front of us. The crest drops away to the SLV in the west and the Wet Mountain Valley to the east. We walk rolling tundra for the remainder of the day and make camp in a protected area ~12,200’  behind a knoll south of Carbonate Mountain. 

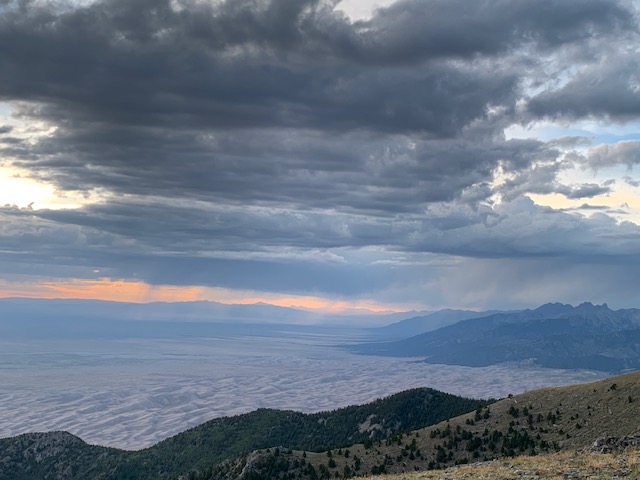
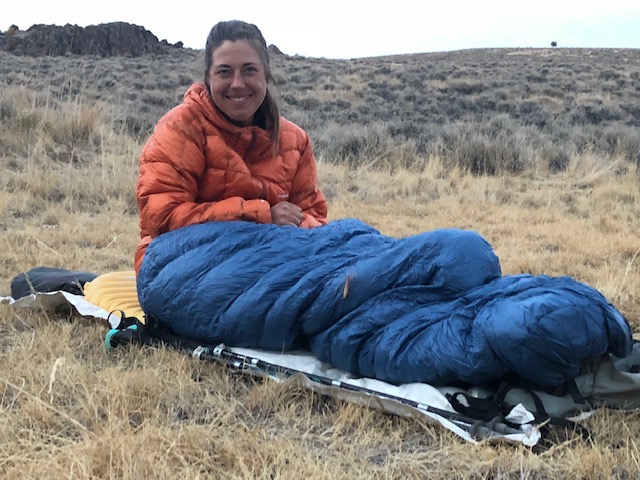
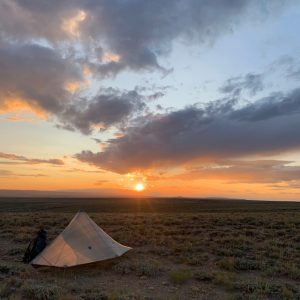
I walk up to the ridge to pee before getting into my tent and I’m astounded by the beauty of the scene that greets me on the other side of the ridge: rain showers over the Sand Dunes and valley to the north tinted pink, orange, and yellow by the sunset. I call Troy up and we enjoy the scene before a chilly wind sends us for our sleeping bags.

Sangre de Cristo Traverse Day 2

The morning is an easy, uneventful four miles down the ridgeline to Mosca Pass, the low point of the route at 9,700’. The spring right off the ridge that we were hoping for is dry and we walk the mile down into the Preserve for water. We go to a spot I’ve stopped at with guided trips in the past. As will become our practice, we fill up for the entire day and head back up to the ridge. 

The next 10 miles of walking up and over Mount Zwischen is long, dry, and hot. It’s also littered with blowdowns. The view out over the Dunes from the summit is pretty spectacular though. The descent is steep through dense forest on tired feet. 

The most joy I find all day is when I pick up bits of elk trail here and there and we can cruise until the path disappears as suddenly as it appeared. At Medano Pass, we descend 500’ into the Preserve to fill up on water behind an established camp from which dogs are barking at us. We hike the 4wd road out of the Preseve and north from the pass until we find a suitable camp underneath the shadow of Herard.

Sangre de Cristo Traverse Day 3

Shortly before 6am, we begin our daily migration back to the ridge. The higher we climb, the windier it gets. As we crest the ridge, the full force of the gales hit, carrying icy wind up from the shadowed valley to the west. We lean sideways into the 40-50 mph eastward winds as we push north over rolling tundra, summiting one small peak after another.

I need more layers, a snack, a break from the wind. I drop off the ridge to the east where it’s nearly windless and it’s 15 degrees warmer. I wipe the snot from the right lens of my sunglasses. We snack, layer up, regain composure and head back into it. We see weather over Blanca to the south as well as the Crestones to the north. Being almost exclusively above treeline, it’s incredible how far we can see around us – all the way back to where we started, and all the way to where we’ll sleep tonight.

By noon, we’re at Music Pass and we trace out the remainder of our route for the day: Marble Mountain, Milwaukee Peak, and the Crestones, beneath which we plan to camp. A steep 1300’ and we’ve regained the ridge. We skirt through the notch by Milwaukee, enjoying an oddly placed mile or so of nice trail that disappears as suddenly as it appeared. 

With 8000’ of vertical on our legs already and daylight waning, we opt to take the Cresolita saddle rather than the ridge directly over Broken Hand Peak. I’m disappointed, but it’s the right call. As we descend into South Colony Lakes at dusk, the pikas’ chirping echoes around the basin. At the outlet of the lake, I achily bend over and wash the grime from my face and legs. We find a protected spot in the willows to settle in for the night. 

Sangre de Cristo Traverse Day 4

Morning comes too soon and sleep was insufficient as I spent part of the night defending my food bag pillow from the mini bear that was scratching around at the edge of my shelter. That’s soon forgotten, however, as we begin our ascent and I’m entranced by the red glow reflected off the Needle. Soon we’ve regained the primary ridge via a fun class 3 connecting ridge from Humboldt. 

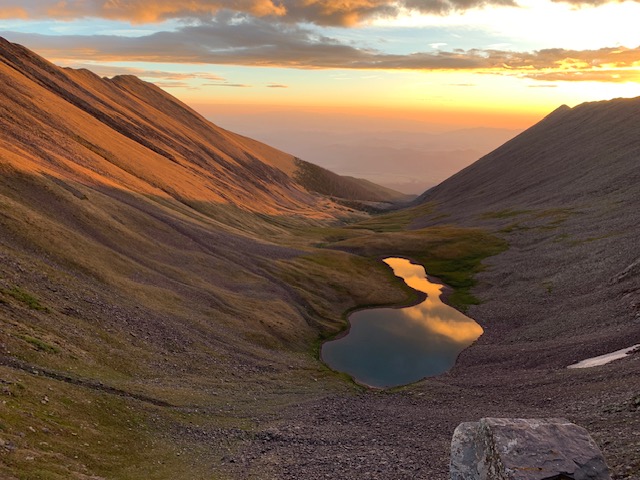
Clouds roll up and over a saddle from the west, blotting out the sun as we climb Obstruction. From the summit, through breaks in the clouds, we look down to Willow Lake, a longtime favorite haven, and across the bumpy ridgeline of 13ers that connects to Adams. In a flat below Adams is Mo Lake, a cat-shaped tarn I christened last August the weekend after I said goodbye to my 17-year old cat.

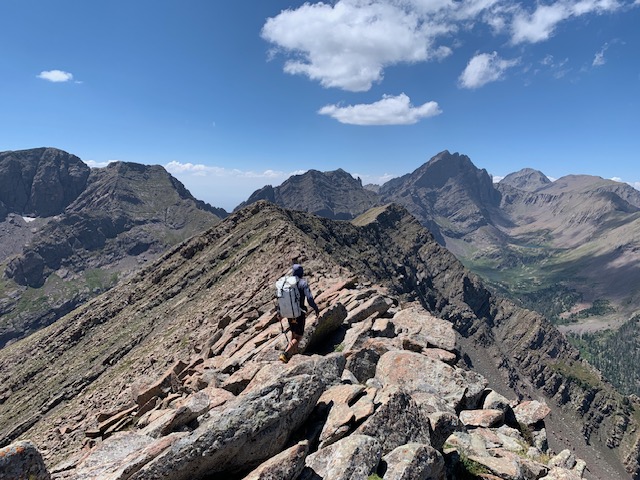
We descend a steep, loose gully skirting below the first two major obstacles of the ridge, which would’ve required hours of technical scrambling, and reascend at the saddle south of Peak 13517. A series of steep, scree-covered slabs and class 4 moves takes us along the remainder of the ridge to Adams. From there, we follow the chunky class 3 ridge to Fluted. The end of the technical difficulties! I’m both relieved (we might actually do this thing!) and sad. The technical parts, while slow, are an engaging puzzle to solve.  

The remainder of the day is rolling block field until we pick up a mile or so of trail in a saddle near Comanche and drop down to Venable for camp. The basin is home to dozens of marmots which whistle at me as I pass through their domains on the way to the small lake. Three deer study me as I gather water. A gentle rain starts to fall and I scurry back to my tent. Cooking dinner from the safety and warmth of my tent, a rainbow appears over Westcliffe to the east. I fall asleep listening to Annie Dillard wax poetic about the glory of nature.

Sangre de Cristo Traverse Day 5

After a night mostly spent listening to the flapping of my tent in the wind, I open my eyes and notice it’s lighter than it should be at 5:03am. I’ve slept through my watch alarm and scramble to pack up as Troy is already almost ready to go. 

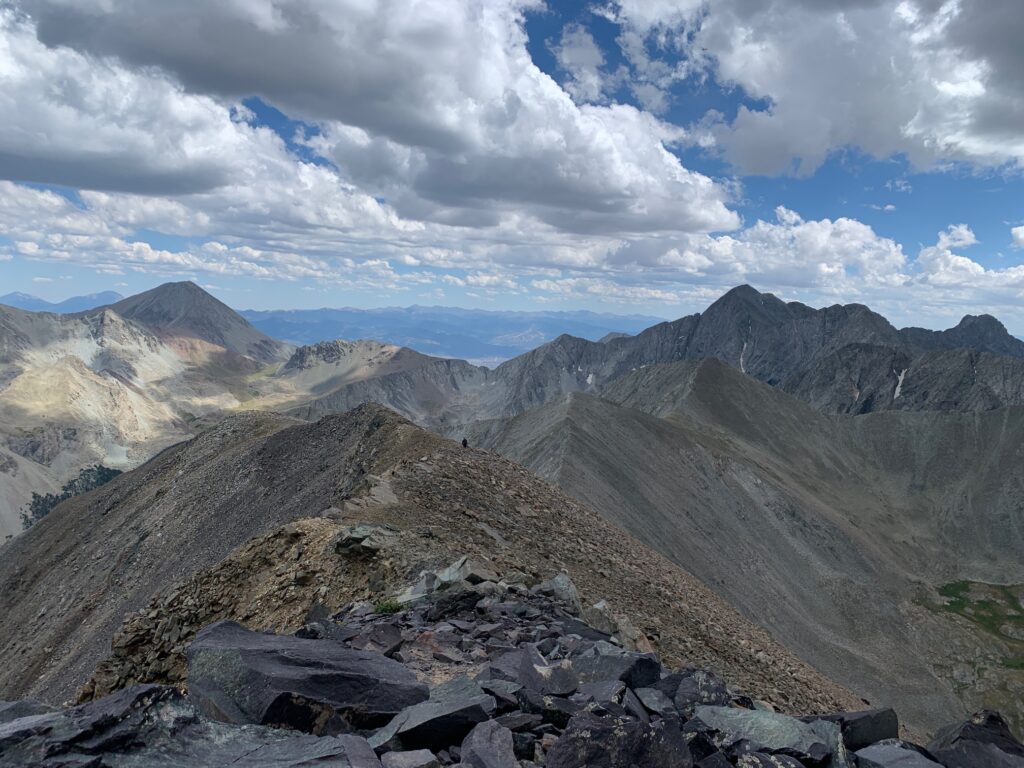
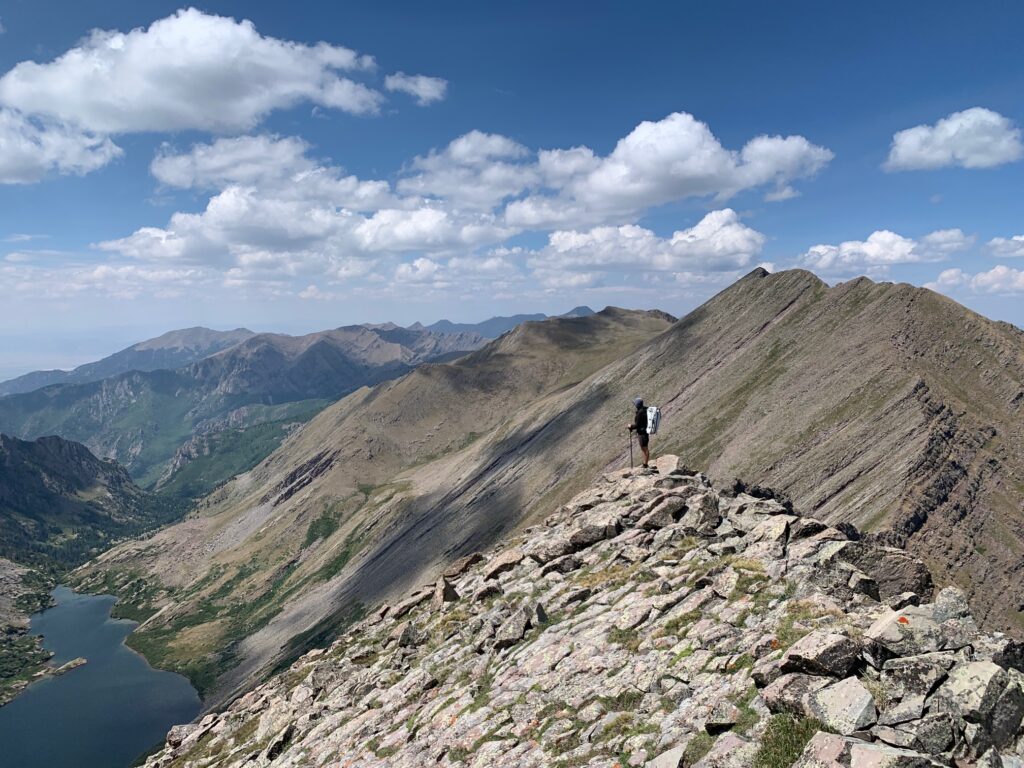
The day is gloriously repetitive, consisting of going up and over several peaks  >13,000’. Up 1000’, down 1000’, up 500’, down 500’, up 1300’, down 1300’. Eureka, Hermit, Rito Alto, Peak of the Clouds, Silver Peak, and on and on. The peaks were a nice break from the slower, technical terrain of the previous day, and more steep and engaging than the rolling tundra I expected. It felt wonderful to walk along the ridges I’ve seen so many times from the lakes below. Occasionally we stop on summit to snack and I just sit and stare contently at where we’ve been and where we’re going.

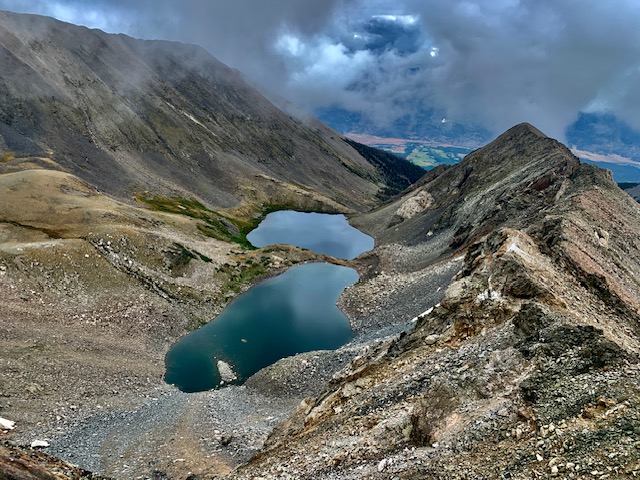
We make camp early at a small lake below Electric Peak. I take my time setting up my shelter and then walk the half mile to gather water. I’m nearly done when I notice movement in the otherwise still tarn. I think it’s insects at first, but the frequency picks up, and I realize it’s rain drops. Covering the water slowly at first, and then more quickly. I rinse my face and legs and scamper to my tent. I hop in just as the squall picks up. I bury myself in my quilt and eat spoonfuls of almond butter and drink lemon chamomile tea while I watch the rainfall outside. I’m warm, dry, and clean in my tent at a remote lake at 12,400’  in my favorite range. It’s hard to imagine any better feeling in this moment.

Sangre de Cristo Traverse Day 6

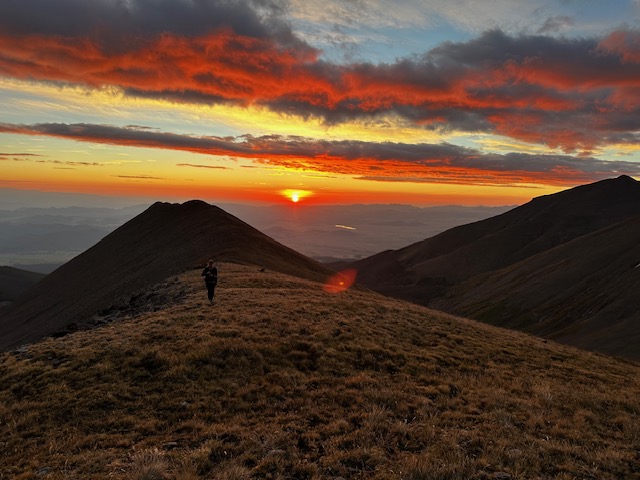
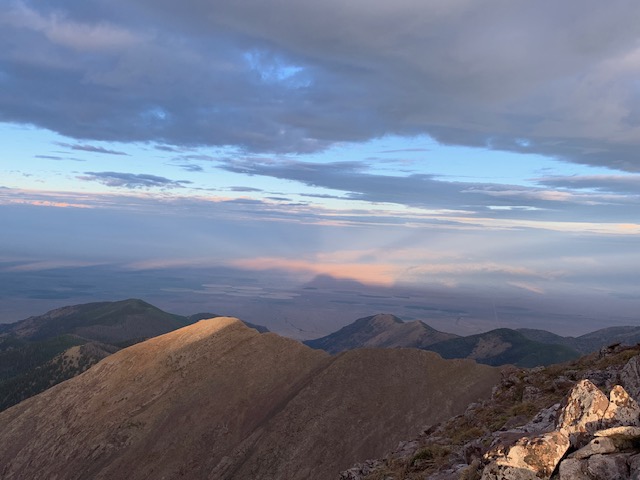
I awoke to a lone pika call at 4:30am, feeling rested and grateful for a full night’s sleep. We climb out of our basin camp and as we regain the ridgeline to Electric Peak, a red sun lights up the Wet Mountain Valley. The surrounding peaks emit a golden glow. The shadow of the range begins to take shape in the valley to the west. There’s the outline of Electric and our microscopic figures crawling up it. 

At the summit, I look north and spot the Chalk Cliffs. HOME! We’re actually almost there. In a way, it feels kind of unbelievable. 

There’s an icy wind, which I’ve come to expect each morning when we regain the ridge. I walk with my hands in my pockets and think about hiking this route again, solo, pushing myself as hard as I can. And then I wonder about that desire to run myself ragged, to walk until there’s nothing left, to find transcendence by searching for the limits of the physical.

Today’s terrain is a continuation of the previous day, and as I hike up another steep rocky ridge, I send a genuine prayer to the universe for endless talus covered 13ers. This feeling is like nothing else: heart pounding, breath rhythmic, in out in out, step step step step, thinking like the sheep, allowing my body to take the most obvious line, connecting bits of worn terrain. Some trampled tundra here, flattened scuffed rocks there, a slight opening in the grass.

At Cottonwood Peak, our main route drops below 13,000’ for the first time in 40 miles. The afternoon is hot and humid as we wind down through blowdown hell (though not as hellish as Zwischen) to Hayden Pass. A quarter mile from the pass my pole breaks. For 25 minutes, we search a small piece of ground for the missing spring. No luck, but I’m grateful for Troy’s help in the search as it’s already been a long day and we’re both ready to find water. We hike out to the pass and descend 500’ before we find a trickle big enough to fill our bottles, and then reascend to make camp.

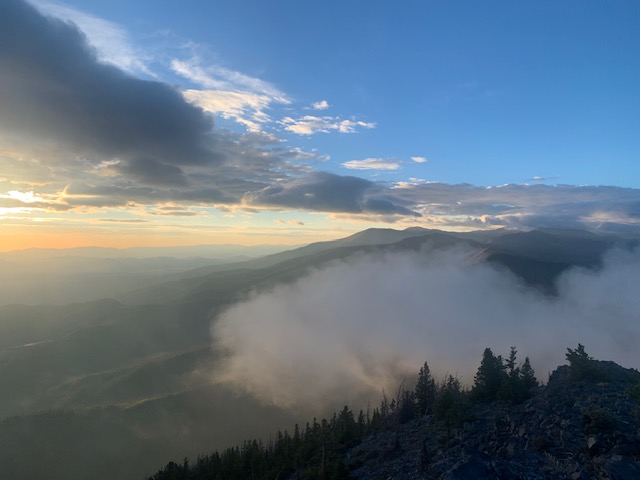
I watch the cumulonimbus build behind the ridge to the south and darken the valley to the east as my dinner cooks. Flash. 1…2…3…BOOM! It’s close. Dinner is done and the show begins. I watch the storm mingle with sunset light as it passes overhead. 

I love this outside life.

Sangre de Cristo Traverse Day 7

I wake up excited for our last full day. We follow old trail up Galena in the twilight. Clouds are rolling in over the pass and the entire sky is pink, orange, amber, and yellow as the sunrise light reflects off the clouds. The beauty is unbelievable.

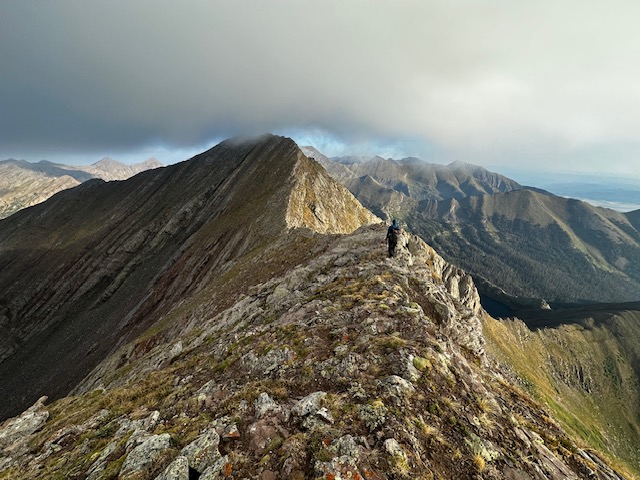
All day, we hike up and down “bumps” on the ridge inside of a cloud. I feel like I’m in a dream, hiking the same 100′ of talus on repeat. Time is standing still. My watch says we’ve been hiking for 4 hours, but I can’t ascertain any progress.

The clouds begin to break a little after noon and we’re above one of my very favorite alpine swimming spots. On a subsidiary ridge, I spot two sheep descending steep talus. It feels so meaningful to connect all these places I love and these peaks I literally look at every morning on my walk, addressing them by name, “good morning Simmons, Hunts, Twin Sisters…

My body feels strong, even after 50,000’ of vertical gain in a week. Stronger perhaps than when I started. I feel gratitude for my body’s strength and resilience. I know it’s not a given.

I watch the sky vigilantly all day as storms build in every direction around us. Around noon we drop 700’ steeply off the ridge to get water. This is our original planned campsite, but it’s early and we think the weather will hold a bit longer. So we test our luck, fill up, and push on. And the weather (and our luck) does hold for another few hours; long enough for us to get up and over Hunts Peak. At the summit, we’re greeted with a cold wind and a loud clap of thunder. It’s raining in the valley directly to our east and up north over Salida. Time to get down!

I inhale a few spoonfuls of almond butter, nearly clogging my airway, and then we haul down the steep scree slope as the wind picks up and thunder continues to echo nearby. We bail into a basin on the east side of the ridge, where 500’ down we see some trees and a potential flat(ish) spot large enough to fit our tents. Hail starts to fall as we make our way down the slippery wet tundra and scree slope. We configure a couple of clever camp spots and as soon as we’re set up, it begins to rain in earnest.

I sit in my tent drinking warm emergenc, eating the last few ounce of almond butter, listening to the pikas, and watching the clouds swirl around the basin. Salida is 15 miles and 3k’ of vertical away. 

Sangre de Cristo Traverse Day 8

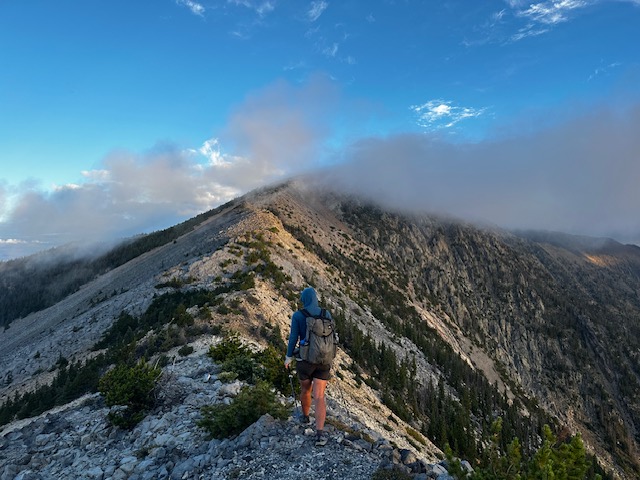
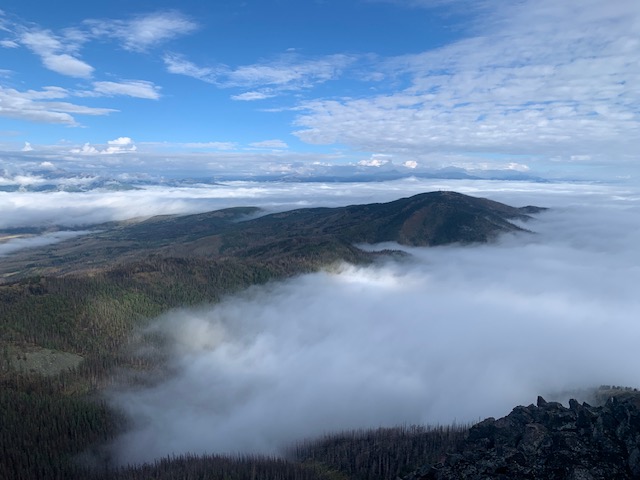
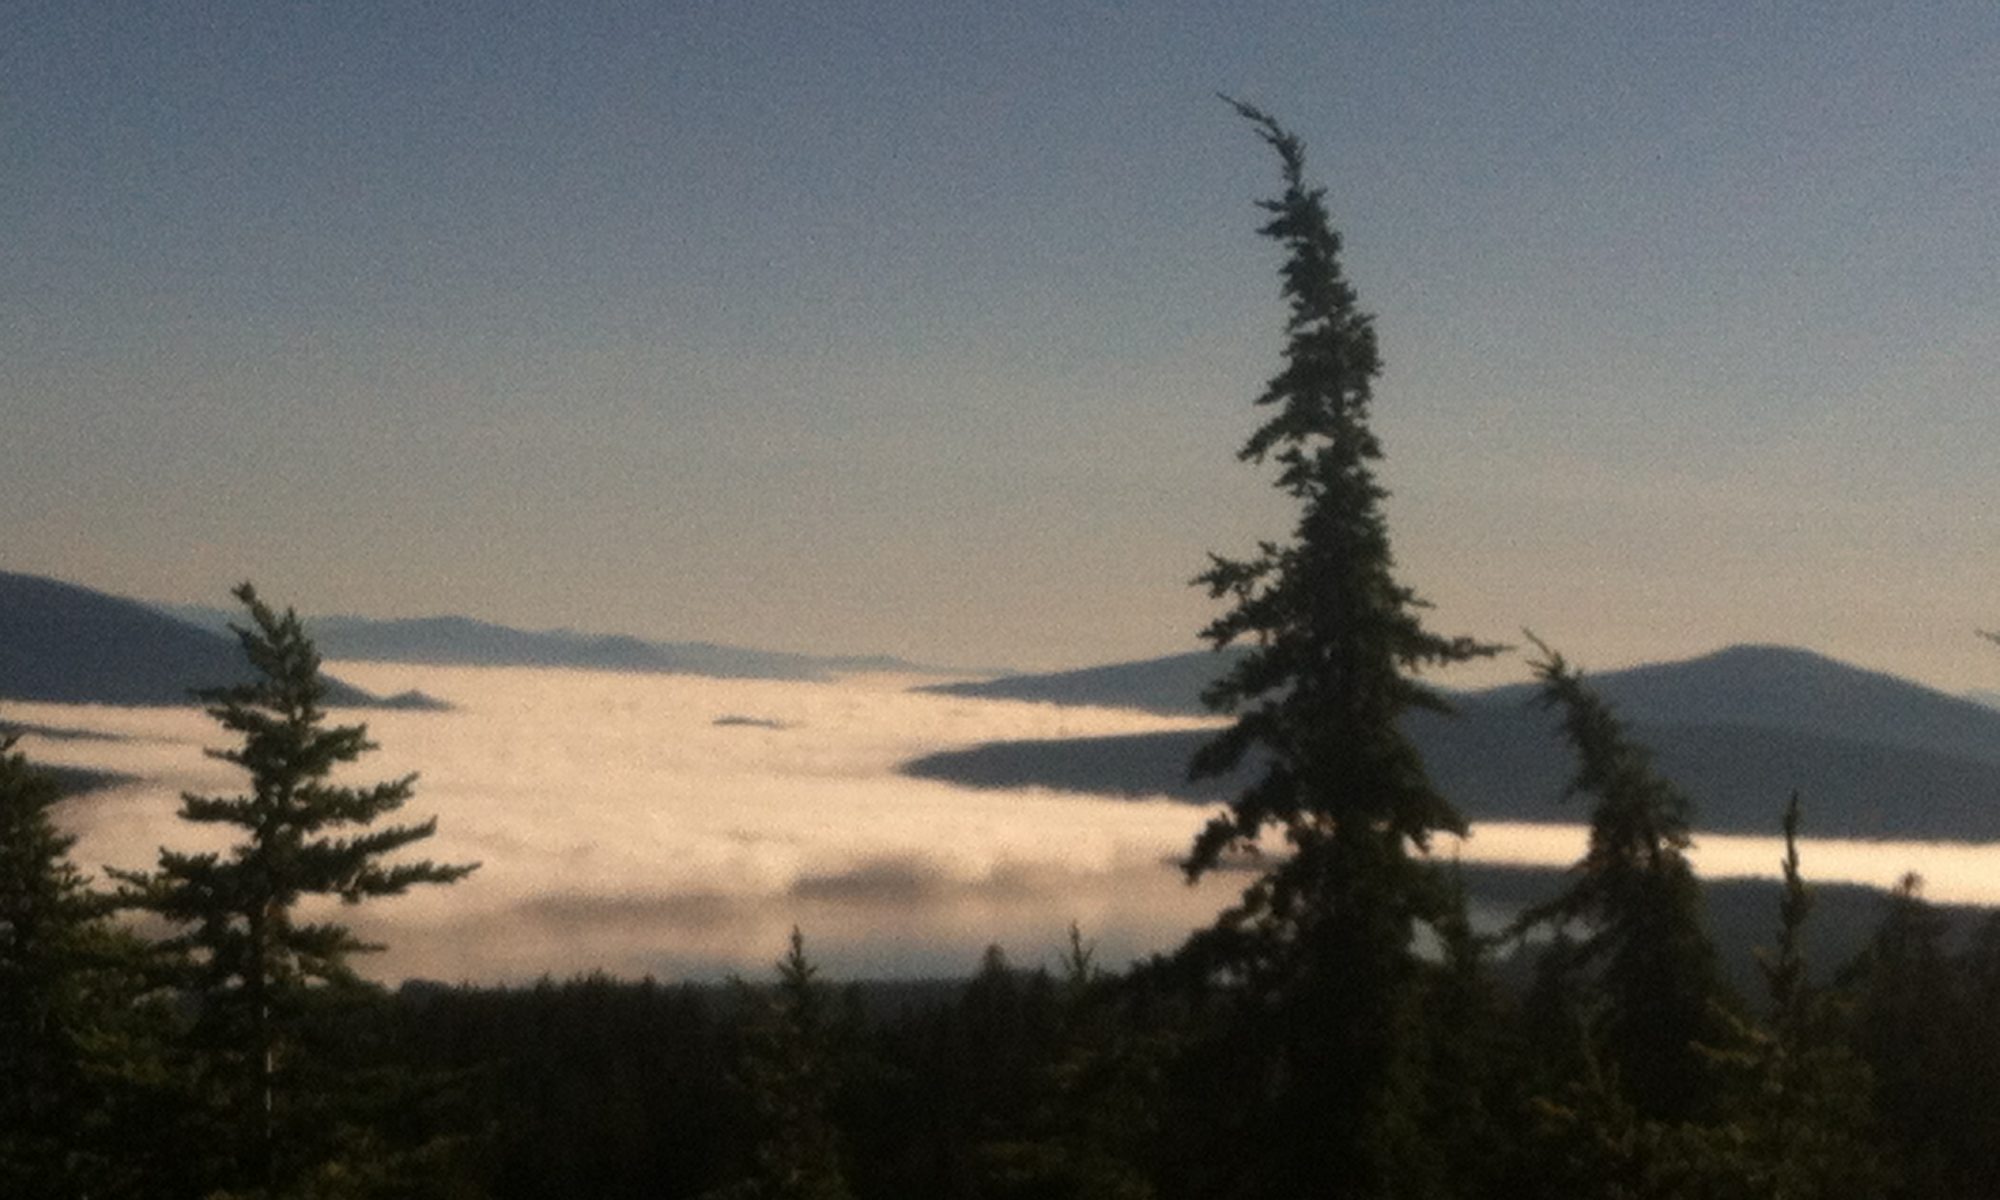
When I awake, the predawn air feels damp and chilly. The sun tries to light up the sky, but we remain inside of a dense cloud for much of the morning. We hike northward, only a few minor peaks and two named peaks before our descent into Salida. After a few hours, the sun begins to burn off the top layer of clouds, revealing the most incredible inversion in the valleys on both the east and west side. The ridgeline is an island of land in a sea of clouds. 

Through the dense fog, I walk north, feeling the magnetic pull of home so strongly I can’t slow down. I periodically stop and wait until I see Troy’s figure emerge from the fog and then I turn and keep walking. The terrain has mellowed into tundra and block field. We reconvene beneath Simmons Peak, remove some layers, and then ascend together. The clouds have burned off even more now. The sky is blue. Salida is 6200′ below under a blanket of clouds. Methodist, our final peak, is one connecting ridgeline away. 

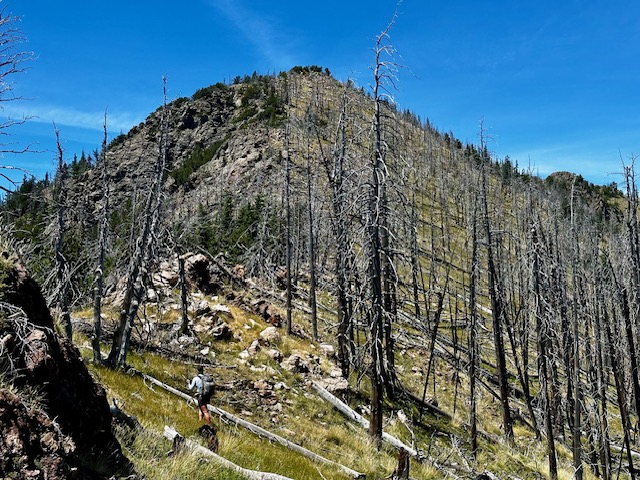
We gingerly crawl down the wet, slippery, lichen-covered rocks and into the blowdown forest that covers the remaining section of ridgeline. The Decker fire came through here in 2019. Amongst the burned out skeleton trees, fireweed and yarrow add splashes of color to the bare ground.

I’m laser focused as I weave in and out of downed trees and baby aspen groves finding elk trails to link together. I round the side of a knoll and spot five elk as they disappear off the other side of the ridge. Thank you for the trails! I stop to snack on raspberries along the way, but never for long. I’ve got places to go. 

After what felt like much longer than it should’ve taken, I’m on the final push up up up the steep southwest ridge of Methodist. There was trail we could’ve taken at the last saddle to bypass this climb, but I forgot, and now I’m here and I’m climbing and panting and soaked from pushing through wet brush, and there’s nothing else I’d rather be doing in this moment than doing exactly this.

And suddenly, I’m standing on a road. It’s the service road that connects to the communications towers on the summit. And shortly thereafter, Troy is there too. We have 9 miles of road walking and 4600′ of descent to Highway 50.  We tap poles and commend each other on a well executed trip.

I look at my watch, “we should be to the burger place by 1.”

“Sounds amazing,” he responds and we begin our descent off the ridge that has been our home for the last 8 days. We walk out of the sun, down through a layer of fog, and eventually Salida comes into view. 

“I’ve walked out of the mountains into a lot of different towns, but never into the one I live in. It feels pretty great,” I say.
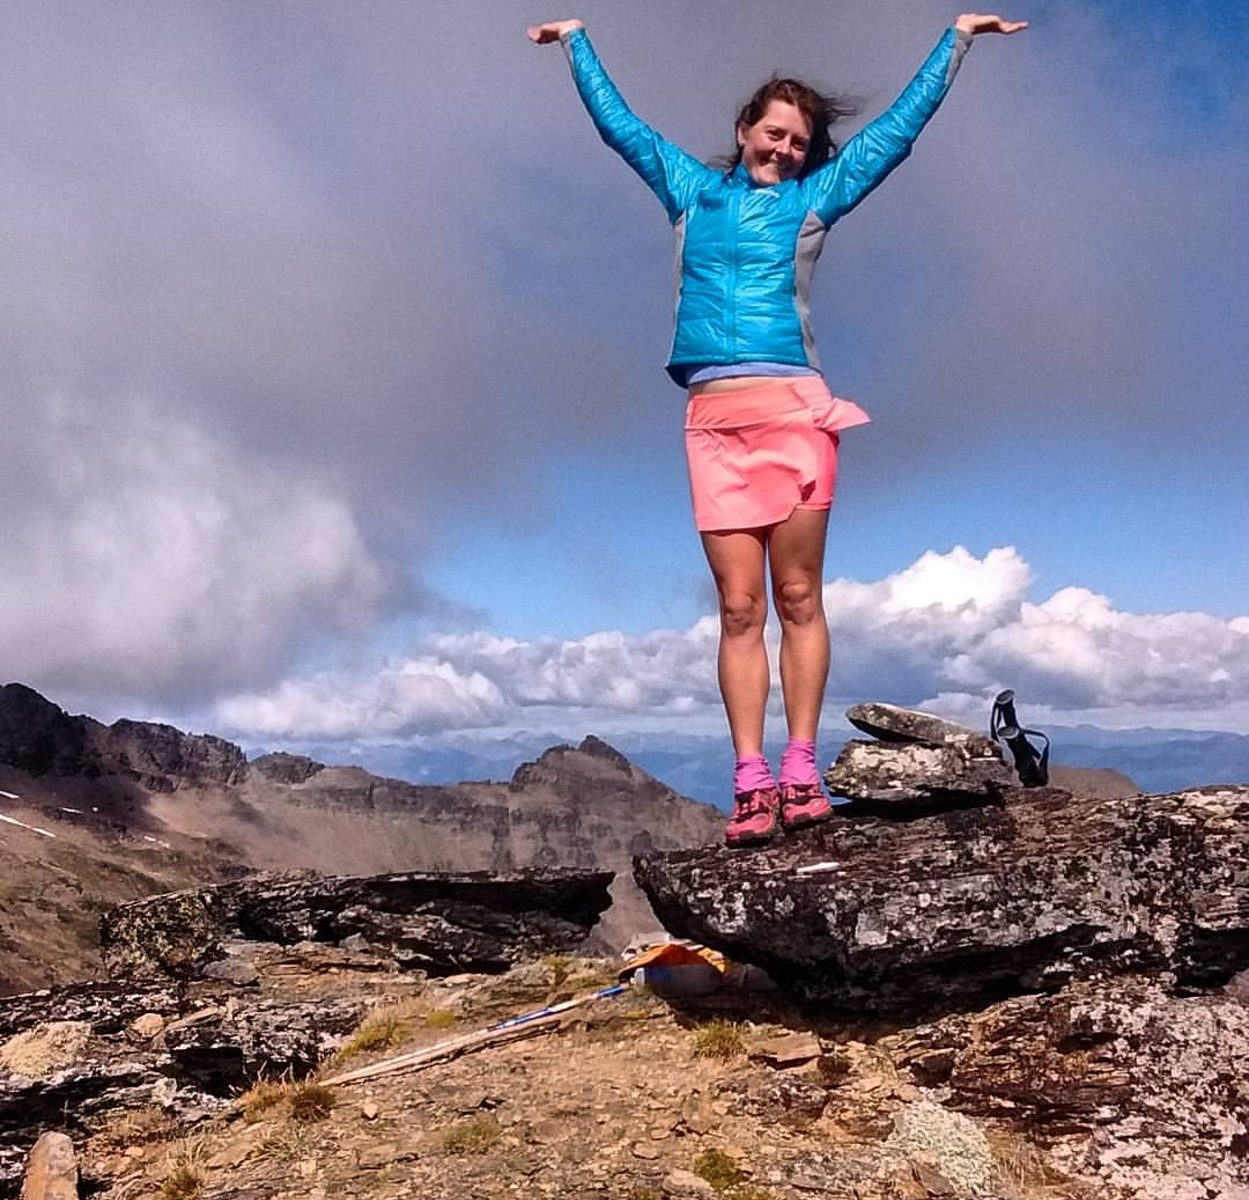
Photo Essay

I intended to pick out 5 or 6 of my favorite photos to share, but here we are with 21.

Photo credit for many of these is Troy Klaassen.

How to Optimize Sports Recovery

sports

This post is about how to optimize yours sports recovery habits, so you can get the most out of your training routine. If you like this, make sure to get in touch over on my Facebook community, Holistic Health for the Avid Adventurer, where we cover topics just like this one. If you’re interested in strategic 1-1 support, you can also apply to work with me. I would love to work with you now or in the future! ~Katie

Your sports recovery habits are just as important as your active training time if you want to get the most out of your fitness routine. During your workout, you break down muscle tissue, deplete glycogen, and stress the body. In order to repair, rebuild, and grow new muscle, you need proper recovery, so you can build more strength and endurance.

Proper recovery is essential for every body, and if you find yourself sore for long periods of time, dealing with chronic injuries, and unmotivated to complete your workouts, you’re likely overtraining. It’s time to listen to your body and focus extra attention on rest and repair. Use the following tips to optimize your recovery periods. 

Focus on Whole Food Nutrition

Muscles need protein and carbohydrate to recover. Protein repairs and rebuilds muscle fibers, while carbohydrates restore depleted glycogen stores. It’s also important to ensure you’re consuming enough calories, especially if you want to build muscle. Focus on whole food sources, such as vegetables, fruits, nuts, seeds, whole grains, eggs, and lean meat. Eating whole foods helps you get adequate vitamins and minerals, which are essential for reducing inflammation and speeding recovery.  

Prioritize Sleep

To properly recover, your body needs enough sleep, which is 7-9 hours for most adults. Inadequate sleep negatively impacts growth hormone production and insulin sensitivity. Optimize sleep through basic sleep hygiene, like cutting off stimulants after noon, sleeping in a dark, cool environment, limiting blue light exposure 1-2 hours before bed, and maintaining a consistent sleep and wake time.

Hydrate

Proper hydration can support recovery by helping you to digest the nutrients needed for the thousands of biochemical reactions in your body that keep you healthy. Furthermore, dehydration following a workout can slow the protein synthesis needed for muscle repair. Rehydrate after exercise by drinking 16 ounces of fluid for every pound lost during exercise. If you’re significantly dehydrated, consider adding an electrolyte mix, coconut water, or even a pinch of mineral salt to your water.

Engage in Rest Days + Active Recovery

Workout frequency is an important aspect of a proper sports recovery plan. Include at least 1 rest day per week and avoid working out the same muscle group two days in a row. Engaging in active recovery activities like gentle yoga, walking, stretching, and foam rolling can promote blood flow, help move waste products out of the body, and speed recovery. 

Cold Therapy

Consider taking a dip in a cold lake or a plunge in an ice bath after workouts. Research has shown cold immersion to significantly reduce muscle soreness.

To get the most out of your workouts, remember that including optimal recovery techniques is just as important as the time you spend training!

Related Posts:

3 Tips to Get More from Your Home Fitness Routine

6 Mistakes to Avoid to Hit Your Health Goals Faster (without dieting!)

Stress Eating: Why You Do It + How To Stop

Ready to take the next step on your journey?

Schedule a free strategy call here. In 30 minutes, we’ll define your top health + adventure goals, we’ll determine the primary obstacles in your way, and we’ll discuss a clear path to close the gap between where you are now and where you want to go.

How to Hike More Miles in a Day

Do you want to hike more miles in a day without injuring yourself or not being able to get out of bed the next day? 

Increasing daily mileage is a common goal for backpackers and hikers. Whether it’s because you want to expand the trails and trips available to you during your limited time off work, or because you need to finish a thru-hike within a weather window, or for entirely different reasons, here are the strategies I’ve used over the course of 8,000+ miles to consistently hike 30+ mile days. 

To be clear, I’m not telling you this should be your goal. I’m simply sharing strategies I’ve used to increase daily mileage while remaining largely injury-free. As always, take what serves you and leave the rest. 

Fuel for Performance

Hiking all day puts a lot of demands on the body. To reduce inflammation, optimize recovery, and have more stable and abundant energy, what you eat matters. Eating healthy doesn’t need to be complicated or expensive. The simplest advice is to focus on eating mostly whole foods. That means things like veggies, fruits, nuts, seeds, legumes, or anything without an ingredient label. Your body will digest these types of foods better, giving you more energy for hiking. This doesn’t mean there’s no room for treats. Just aim for 80% of your calories to come from real food.

Be sure to consume adequate calories, including enough of each macronutrient (protein, fat, and carbs). Eat and drink water regularly throughout the day. On a long hike, I snack (200-300 calories) at least once every 2 hours. 

Hike Longer, Not Faster

Trying to hike faster, at a pace that’s not natural to you, usually doesn’t work, and it can often lead to injury. A more effective strategy is to put in more hours. Start earlier in the day, take shorter breaks, and hike later into the afternoon. I like to organize my gear the night before, so I’m ready to hit the trail in the morning. I also look at my maps for the next day to avoid (as much as possible) getting off route. In the mornings, I put snacks in convenient spots so I don’t need to dig into my pack every time I’m hungry. 

Carry Less

Being intentional with what does and does not go into your pack serves a variety of purposes. First, carrying a lighter load is easier on the body. It requires less energy to carry a lighter weight, so you can hike further with less exhaustion. Additionally, carrying fewer items simplifies setting up and taking down camp, creating more time for hiking. There’s a lot to share about how to carry less safely, but that’s a topic for a different post.

Build Miles Gradually

Too much, too soon is a surefire recipe for an overuse injury. Many hikers hit the trail with a lot of exuberance and not much training under their belt, only to end up sidelined shortly thereafter with shin splints, plantar fasciitis, or knee pain, or other inflammatory injuries. Much of this can be avoided by building miles the smart way. In general, this looks like increasing mileage by no more than 10% each week, taking practice hikes with a pack on, and including adequate recovery.

Optimize Recovery

To perform well, your body needs proper rest. A big part of recovery occurs during sleep. Optimize sleep through basic sleep hygiene, like cutting off stimulants after noon, sleeping in a dark, cool environment, limiting blue light exposure in the evening, and maintaining a consistent sleep and wake time. Other recovery exercises that can move lactic acid out of the body and help you perform better include foam rolling (a water bottle can suffice o on trail) and stretching.  

Master Your Mindset

“Whether you think you can or you think you can’t, you’re right.” This famous Henry Ford quote sums it up pretty well. To achieve anything, you must first believe you’re capable. When I was first getting into long distance hiking, the thought of hiking more than 15 miles in a day seemed absurd. The more time I spent in the community watching others do this, the more it seems achievable for me. For anything you want to achieve in life, it helps to see that there are others already doing it, and to see that they’re no different than you. It may take work to build up to your goal, but with time, you can absolutely get there!

For the complete blueprint on preparing your body inside and out for a healthy adventure, take the Adventure Ready course

additional resources: 

Ultralight Healthy Meal Plan eCourse

Eat for Endurance eBook

Related Posts:

Healthy Lightweight Eating for Hikers: A Day in the Life

Supplements on the CDT for Energy, Immunity, and Endurance

The thru-hiker calorie myth: What your diet is missing and how to eat for endurance

5 Steps to Stay Ready for Adventure

adventure

This post is about the 5 things I’m doing to stay ready for outdoor adventure, once the coast is clear. If you like this, stay in touch over on my Facebook community, Holistic Health for the Avid Adventurer, where I do free trainings on topics like this one. You can also follow me on Instagram @katiegerber_wellness and DM me anytime to say hi! If you’re interested in strategic 1-1 support, schedule a free call and we’ll see if we’re a good fit. I would love to work with you now or in the future! ~ Katie

Are you pretty much always dreaming of where you’ll go and what you’ll do when you can get into the outdoors again?

There’s nothing quite like the freedom of hiking through the wilderness, with the sun on your skin, the breeze in your hair, and open trail ahead.

Hiking around my local reservoir today, I got caught in a thunderstorm. I felt the temperature drop, the winds pick up, the goosebumps on my skin, and then the first few drops of rain pelting my face. It was fantastic. I felt alive. I felt the sense of OK-ness that I get when I’m in nature.

And it reminded me that I may not know when my next big outdoor adventure will be, but I have no doubt that it will happen again at some point. And when it does, I want to be ready to get out with confidence and enthusiasm. What about you?

Here are 5 steps I’m taking to stay prepared for adventure.

Gear Inventory

This includes:

  • cleaning up gear that’s been shoved to the back of the closet after my last trip
  • repairing gear
  • giving away or selling anything I no longer need or will use
  • testing gear that I want more practice with before I take it into the field
  • repairing gear, giving away or selling anything you don’t need, and testing gear you want more practice with.  

Research + Inspiration

I have a running document of hikes or trips that I would love to do at some point. A bucket list of sorts. When I’m thinking of planning a trip, like I am for this fall, I’ll look over this document, and I’ll highlight the ones that would be appropriate for the season and the length of time I have available. From there, I decide what my soul feels most called to, and then I dive into research. This keeps me motivated and inspired. Additionally, having a general plan in place allows me to be ready to execute on it and get out there if/when that’s possible. 

Food Inventory

This involves:

  • cleaning out expired backpacking food
  • taking an inventory of what’s left (I like spreadsheets for this!)
  • bulk cooking and dehydrating meals (I’m not the kind of person who enjoys this, but it’s a great activity to be doing if you are!)
  • potentially planning a resupply strategy if I have a specific trail in mind
  • creating a menu and determining what I still need to purchase for said resupply plan (Here’s a free ecourse on how to do all of this!)

Stay Connected to the Trail Community

Taking time away from the trail and my normal adventure buddies doesn’t have to mean being completely disconnected. Making an effort to connect virtually with trail friends keeps us inspired and reminds us that we’re not alone in our longings to get back outdoors. To me, this is essential for not falling into a hole of despair due to canceled plans and future uncertainty. There are a myraid of options, including subscribing to the newsletters of your favorite trail orgs or joining one of the hundreds of outdoors-related Facebook groups. Webinar meetings are a great way to see like-minded humans ‘face to face’ and nearly every organization is offering this new style of connecting and learning.

Get My Body in Tip Top Shape

I know from experience that I feel SO MUCH better when I hit the trail with my body already tuned in to good nutrition and regular movement. I have more energy, I can hike more miles more easily, and I’m less prone to overuse injuries. It makes my adventure more fun and increases the likelihood that I’ll be successful.

Having the structure, support, and accountability of a coach can massively accelerate progress towards health goals. Furthermore, focusing on your adventure as your motivation for training and eating helps you stick to it when you face (inevitable) challenges.

What else keeps your spirits up and your motivation high between adventures? Let me know in the comments!

CLICK HERE to access more free resources to help you get outside feeling strong and healthy for your next adventure!

Resupply 101: Options & Tips for Food Drops on Your Long Distance Hike

ODT resupply

A portion of this content was created as part of a collaborative effort by the executive board of the American Long Distance Hiking Association – West for a presentation at one of their spring Rucks.

What am I going to eat?!? 

This is a big concern for hikers heading out on a long trail. What, when, and where you’re going to pick up your next food drop on a hike is something that you’ll want to consider, at least briefly, before hitting the trail.

This article will cover how to start planning your food resupply for the trail. We’ll review your options, including the pros and cons of each, and wrap up with some tips for execution.

Resupply Planning Overview

Begin by identifying where you absolutely must send a box. There will almost certainly be at least a couple of towns like this on each trail. These towns have extremely limited or non existent resupply options. You’ll need to look at what resupply options are available in a town and determine if that’s adequate for how you like to fuel your hike.

In that regard, it’s helpful to know ahead of time what type of food makes you feel best when you hike. I encourage you to experiment before you get on the trail! For instance, I (as you might imagine) like to eat pretty healthy, so five days of snickers, pop-tarts, and pastries wouldn’t cut it for me. Others might be ‘fine’ with this. The point is that it’s important to know thyself. 

You don’t have to find resupply information from scratch! Nearly every trail has an associated trail organization that will provide some information on resupply options available in each town. Use that guide to determine where you will need to send a box. Additionally, you can find other hikers’ resupply strategies for a particular trail by reading trail journals. You can also consult survey results from each year’s previous class of hikers

resupply

How to Send a Box When One is Needed

Once you determine where you need to send a resupply box, you have a couple of options on how to do that. You can 1) purchase your food ahead of time, box it up, and solicit a point person to send it out for you, or 2) you can purchase food on trail at a town that’s 100-200 miles ahead of the town where you’ll need the box sent. Plan for mail to take at least five days. 

Food boxes can be sent General Delivery via the United States Post Office (USPS). Alternatively, they can be mailed to a store, motel, or restaurant in that town that accepts hiker food boxes to be sent to them. Either way, call ahead to inquire about the correct address and hours. Additionally, if it’s not a PO, ask whether the place accepts boxes and if there’s a fee associated. Also ask if it’s best to send USPS, FedEx,  or UPS.

To find the Post Office that handles General Delivery in any area, call 1-800-ASK-USPS or check usps.com. Rates are found on the website and currently, they range from $13-19 for medium to large flat rate boxes.

How to address your USPS box for general delivery:
JANE HIKER
c/o GENERAL DELIVERY
TOWN, STATE ZIP

It’s recommended to write “PLEASE HOLD FOR HIKER (name), ETA: (date)” somewhere on the box. Furthermore, it’s recommended that you use priority mailing via USPS because, if for some reason, you cannot pick up your box, you can “bounce” that food box to another post office up/down the trail or request it be returned to sender.  On that note, always include a return address.

Options for Your Resupply Strategy

Now that we’ve covered how to handle your resupply when you absolutely need to send a box to a location, let’s look at your overall strategy.

Essentially, you have three options: 1) Prepare boxes in advance to send to each location you want a box. 2) Buy as you go, sending boxes ahead to each location you want a box. 3) A mix of the above strategies. Read on as to why you might choose one strategy or another. 

Buy Ahead Resupply Box Approach 

This option entails preparing and packaging food at home to send to towns on trail where you determined you need or want a box. You buy groceries in towns where you don’t send a box.

This approach requires that you purchase all of your food in advance, (possibly) repackage it, and box it up before you hit the trail. It also requires that you have a responsible point person to send your box out in a timely fashion. If boxes aren’t picked up at the PO within two weeks of arrival, they’re sent back to the return address. As a footnote, if you think you won’t make it to the PO for your box on time, try calling them, explaining the situation, and asking them to hold it a bit longer. Be kind and they’ll likely say yes. 

For best success with this option, pack your box ahead of time, address it, and have it ready to go, but do not tape it shut. It may be necessary to have your point person add or subtract items that you discover you need or don’t need in the box. Additionally, you might consider numbering your boxes, so when instructing your point person to send a box you can email, phone, or text and say, “please send box #3 out by this date.” This ensures no thinking or second guessing on behalf of the point person. Make it easy for them!

PROS
  • You can guarantee your nutritional needs, wants, and desires. Organic and options for restricted diets can be limited. A good option for those who need prescription medications.
  • You can budget your food.
  • No need to spend time in town purchasing food for the next stretch. Less chores in town frees up more time for relaxing. Alternatively, you may choose to just pick up your box and leave town. In that sense, this option is great if you’re in a hurry.
  • You can send hard to find items like gas for your stove (IF YOU SEND VIA GROUND ONLY). Basically, if there’s a need you discover while on trail, you can ask your point person to send it.
  • You can add your maps for your food box to avoid mailing them separately.
CONS
  • You’re stuck eating what’s in your box. Of course, you could send it back and purchase in town if needed, or you could throw it in the hiker box. But typically, the cost of not eating what you’ve already purchased, packed, and mailed outweighs the cost, time, and energy of sending it back home and buying in town.
  • Requires more planning time before you hit the trail.
  • Post office hours vary and sometimes you may get into town after the PO is closed or on a Saturday whereby you will have to wait until Monday morning to get your food. PO’s can close down seasonally.
  • The box gets sent back because it wasn’t picked up in time.
  • The delivery gets mixed up by your point person or just fails to get to the PO.

Buy As You Go Resupply Approach

If you don’t have dietary restrictions and you want to ease the pre-planning time before you embark on your adventure, the buy as you go option is ideal. 

Most towns have grocery stores, both large and small, where you can purchase food. Others, however, have only a gas station/convenience store, which is basically the “bottom of the barrel” when it comes to nutrition.

PROS
  • You can support local businesses.
  • You can purchase the food you are craving and change up your menu as you hike.
  • If you have food left over when getting into town, you don’t need to buy those items in town.
  • You’re not tethered to the open and close times of the PO.
  • If you have to leave the trail due to illness, injury, homesickness, etc… you don’t have a ton of un-eaten trail food boxed up at home. (If you do, you could donate and send it to hikers in need).
CONS
  • Prices can be slighter higher than average in a remote grocery store.
  • Organic, vegetarian, vegan, gluten-free, etc… foods and specialty items are typically not available in small towns.
  • Hikers ahead of you may wipe out staple items like tuna packets, ramen, coffee, etc. before you arrive.

Combined Approach

You could use a combination of both strategies. This entails sending some resupply boxes ahead of time, from home, and mailing some ahead while on trail. For some, this is the best of both worlds. To determine which towns need a box sent and how to do that, consult the first section of this post. 

For the boxes you send from home, send those to places where you want to send prescriptions medications or where you want to send food items you can’t get in most towns. This may include dehydrated foods you’ve made ahead of time or specific brand name or specialty items. For sending boxes from on trail, the idea is to ensure freshness, satisfy new cravings, and adds variety to your trail diet. 

tiny town healthy resupply

General Resupply Tips

  • Create a resupply spreadsheet. Having a spreadsheet with your resupply locations, whether you’ll send or buy from that location, how much food will be needed for the next stretch, and any other pertinent information is helpful for staying organized and reducing stress once on trail. Be sure you can access this spreadsheet from your phone and leave a copy with your point person, if you have one. Here’s a sample from my Oregon Desert Trail hike. Feel free to use this as a template!
  • Collect tiny condiment packages throughout the year. These little packets of ketchup, mustard, honey, hot sauce, relish, salt/pepper, etc. are perfect for tossing into your resupply boxes you send from home. They can really spice up a trail meal 😉
  • Add flair to your resupply box. There will be hundreds of boxes JUST LIKE YOURS sent by hikers JUST LIKE YOU to these post offices. Adding a giant sticker of a walrus, unicorn, yeti, etc. to the side of the box helps identify your box from others. When you arrive to pick up your box, give them your name and say, “it’s the one with the giant pink squid on the side.” 
  • Add extra ziplocks into your resupply box. You may decide to throw some of your food into the hiker box and/or purchase some food that needs to be re-packaged. 
  • Consider tossing in travel size soap, shampoo, conditioner, laundry detergent, razor, etc. for resupply boxes to towns where you plan to take a zero day. 

For a deep dive into performance nutrition and meal planning for backpackers, check out our online course on the topic.

Related Posts

How to Create a Healthy Resupply from a Convenience Store

Sample Lightweight Healthy 5-day Meal Plan 

The Thru-hiker Calorie Myth: What your diet is missing and how to eat for optimal energy and endurance instead

Want to prepare your body for optimal endurance, energy, and recovery on your next hike? Watch our free Adventure Ready Masterclass on creating your unique nutrition plan!

Recover & Repair from the Holidays

hiking season

The Trail Show Salty Segment February 2020

The Question

Dear Salty, 

The holidays are over and winter is in full swing. I feel sluggish and tired, but spring is taunting and I know when it hits I will want to be ready to hit the trails. I know I need to just get out and exercise more, but what else can I do to repair my body so I’m ready to go?  

I know there are all kinds of cleanses but how do I decide which one and how do I know which supplements are just sawdust in a gelatin capsule? I don’t regret my choices. I had a great holiday season, but I know I’m a wee bit depleted. 

Thanks for all your wisdom…hope to see you in the colon cleanse aisle at Whole Foods.

Buckles

The Answer

Great question, Buckles, and good for you for getting a jump start on a healthy hiking season.  This is a great time to repair your body so you’re fully prepared when spring rolls around!

Safely Incorporate More Movement

Like you mentioned, getting back to regular movement is a great start. If you’ve been inactive for the winter, remember to start low and go slow with building up. This will help you avoid injuries that could derail your hiking season.

Focus on Whole Foods

The place to start with repairing your body from holiday overindulgence is getting back to a primarily whole foods diet. As a reminder, whole foods are things that don’t have an ingredient label, such as broccoli, fish, apple, etc. 

Rest & Repair the Body with a “Cleanse”

A “cleanse” can be a good reset for the body and helps some people to make a clear transition in their minds into a new phase where they’re prioritizing healthy habits. The basic idea is remove inflammatory foods so your body has a chance to divert resources to repairing your body. Reducing inflammatory foods is also fantastic for supporting a healthy microbiome, which is imperative for nutrient absorption and assimilation.

If you’re looking for a place to start, I’d suggest trying the AIP protocol or Whole30. These involve removing inflammatory foods, like alcohol, sugar, dairy, and grains for 30 days. If you really want to go for it, there are many benefits to fasting. To avoid having a really hard time, messing up your metabolism, and/or losing muscles, it’s imperative to choose the right type of fast for your body and to approach it in a smart way. This is particularly important if you have hormonal imbalances or adrenal issues. Read this post, do your research, and consider working with a practitioner who can safely guide you. 

Keep in mind, the focus of these cleanses is not restriction and rapid weight loss (though weight loss may occur). It’s about giving the body a reprieve from incoming stressors and allowing it to be repaired. But, you don’t have to be extreme, and actually I’d suggest you don’t because those approaches generally aren’t sustainable. 

Repair with the Right Supplements

It wouldn’t be a bad idea to get on a high quality multivitamin or greens power for a month or so to top off vitamin and mineral stores that have been depleted by overconsumption of nutrient poor food, stress, alcohol, and lack of sunlight. 

To avoid buying sawdust (or worse), I’d suggest going through a practitioner or online dispensary rather than purchasing the cheapest thing you find on Google or Amazon. To create a free account and receive 10% off professional grade supplements, you can use my online dispensary here

Speaking of vitamins, it wouldn’t be a bad idea to get on a high quality multi or greens power for a month or so to top of vitamin and mineral stores that have been depleted by over consumption of crappy food, stress, alcohol, and lack of sunlight. It also supports your microbiome which is the foundation of feeling good

Get More Sunlight

Another free tactic I’d highly recommend is that you start getting out in the sun. This will support your circadian rhythm which supports proper hormone production which supports immunity, digestion, and restful sleep. I’d say get out at least 3 times per day- morning, noon, and night-for a minimum of 10 min each time. This will also help with vitamin D synthesis which will help with a lot of things, including the sluggishness. If it’s not possible to get outside for sunlight where you live, consider red light therapy or full spectrum light therapy. 

Recover & Repair Recap

So, to recap, whole foods and exercise are the foundation. If you’re called to do a cleanse or fast, do it safely by doing your research first. Top off vitamin stores through a good multi and/or greens power. Support your gut with fermented food and soluble fiber. Finally, get outside for sunlight three times per day. 

Do these things and you’ll be ready to crush those miles once spring rolls around.

These tactics (and much more) are exactly what we cover in the online Adventure Ready course, where you learn how to go from winter mode to being completely physically prepared for hiking season. We cover nutrition, creating a training plan, how to optimize your gut health, upgrading your sleep so you perform and recover optimally, and how to manage your stress to keep your hormones functioning at their peak levels. 

Related Posts

How to recover from holiday overeating
TTS Q last january: how to recover from overeating

If you’d like to submit your own question for a future Trail Show Salty Segment, click here.

How to Prepare for Big Physical Goals

by Guest Contributor Heather “Anish” Anderson

An ACE certified personal trainer with over 30,000 backpacking miles, Heather became the first female triple triple crowner and the first female calendar year triple crowner when she hiked the AT, the PCT, and the CDT in one March-November season in 2018. She holds the overall self supported FKT on the PCT and the female FKT on the AT and AZT. She is also an ultra marathoner, peak bagger, and mountaineer working on several ascent lists in the US and abroad. Heather is a speaker, and is author of the book Thirst, which chronicles her PCT record.

It’s that time of year again…where we start reflecting on the past 365 days and making resolutions for the next 365 days. So many of our determinations revolve around health and exercise; including those who plan to do a long-distance backpacking trip as their New Year’s Resolution.  But why do we spend so much time resolving to do better in the arena of wellness and often times not end up following through?

I think so often our goals are unreasonable. We want to attain perfection without the work. Or, don’t fully understand the commitment to lifestyle and mindset change that is not temporary. These, along with our deep-seated dissatisfactions with our own selves, are fuel for the “failure fire.” I could write volumes about this, but for this blog I’m going to focus on a few points especially with regard to preparation for a big, physical goal (like a race or long-distance hike) since that’s my specialty as a personal trainer.

First of all, I’ll start with the essential (and shockingly, often not obvious) truth that you need to know and accept: You are capable.

You are capable of achieving your goals. It might take you a longer time or more work than someone else, but you are capable of effecting great change, massive health improvements and finding yourself able to complete things you couldn’t previously. The key is to believe in your ability to improve.

Secondly: Set stepping stone goals.

I’ve worked with a lot of people over the years and the number one reason people drop out of a program is because they’re not seeing the results they expected right away. The truth is you won’t see the end result without long-term work. It’s great to have a big, audacious goal. But once you have it, break down the steps you’ll need to get from where you are to that goal and focus on building from one sub-goal to the next. You’ll stay motivated in your training when you’re seeing the results you expect as you reach each subsidiary benchmark.

Take a cue from long distance hiking: when you start the Appalachian Trail, you’re going to get demoralized thinking about walking 2,193 miles. Or even across 14 states. Think instead about hiking to your campsite each day, or to the next town. These short term, attainable goals feed that sense of accomplishment you need to keep going. One by one, all these mini-goals stack up to make a whole thru-hike. In the same way, looking at your long term goal through the lens of all the mini-goals that make it up and you’ll find a string of successes that builds upon itself.

Third: Realize this is a commitment to life-change, not just means to an end.

It’s fine to make a dietary or physical activity change for short term goals, if that’s what you want. But realize that if you’re serious about becoming healthier, preparing your body to age well, or prepping for a long-term physical goal it will require life change. You’ll be undoing ingrained habits and replacing them with new ones. Chances are you’ll have to start with concreting foundational changes that may seem imperceptible into your routine before moving on. That’s why the first two steps I listed are so crucial. If you set unrealistic goals, or go too hard too soon you’ll burn out. Think of the changes you’re aiming for as a journey, not a destination. Just like you can’t get from Springer Mountain, Georgia (the southern terminus of the Appalachian Trail) to Mount Katahdin, Maine (the northern terminus) in 10 days on foot, you can’t completely overhaul your wellness and exercise habits in a day either.

If you’re looking to make the changes necessary to really prepare you for long term success remember to take it one piece at a time.  Set your intention not just for the New Year, but for your life. Begin making changes and focus on cementing one solidly in your foundation before moving on to the next. Start with the goal of 20 minutes of exercise every day. Once you’re successfully doing that without missing days you’re ready to take the next step…toward whatever your long-term goals are. If they include preparing to complete a thru-hike you might consider the Adventure Ready online course that Katie Gerber and I have collaborated on.

To stay in the loop for the next enrollment period for Adventure Ready, and to get on the VIP list for early bird promotions, join the email list here (plus get a free winter wellness guide!).

Supplements on the CDT for Energy, Immunity, and Endurance

supplements on trail

In addition to the steps I took to prepare my body for this hike (which I detail here), I credit this supplement protocol with keeping me strong, healthy, and energized for 3 months of 30+ mile days.  Here’s the exact stack of supplements I used for my sub-100 day CDT hike.

Why I Use Supplements

Generally speaking, I prefer to meet nutritional needs through a diet centered around whole foods. However, due to our depleted soils, our compromised food system, and our chronically stressed lives, whole foods are not always enough. Furthermore, strenuous exercise, like backpacking all day, increases the body’s needs for high quality nutrients. The lack of access to fresh food on trail adds another challenge. even when not on trail.

For these reasons, carrying a few thoughtfully chosen supplements on my backpacking trips is worth the extra weight and expense to me. Supplementing gives me more energy, improves my stamina, and boosts my immune system (which keeps illness and injury at bay). I go much deeper into the how and why of supplementing on trail in this post.

Supplements I Carried on my CDT Hike

I’m stubbornly minimalist on trail. To a fault, I’d say. But it is what it is. The point is that this list is significantly pared down from what I might take at home.

Additionally, what I carry may not be what you carry, if you choose to take supplements at all. Because our bodies are all different and have different needs. 

This list is not intended to be a recommendation. It’s provided for informational purposes only. It’s also important to note that I didn’t take these every single day. I took them probably about 80% of the time. 

The Method

Because I like to eat what I like to eat on trail (which I’ve explained extensively here, here, and here), I like to send resupply boxes. The way I handle supplements is that first I choose shelf-stable ones (most are, but pay attention with probiotics and fish oil). Then I look at my resupply sheet (like this one) and I divvy them up into small plastic baggies with the number of pills per baggie corresponding to the number of days of food in that box. For example, if I’m creating a bag for a 4-day stretch of trail, I put 4 of each pill into the baggie. Then I drop the bag into the box. It’s that simple.

I don’t worry about supplements in the resupply stops where I don’t have a resupply box. The idea is to get them into my body often enough to boost my health significantly, but not to be overly strict about it.

I generally took my supplements with a morning meal or snack, except where otherwise noted.

These supplements went into every box: 

Ashwagandha

Ashwagandha, Withania somnifera, is an adaptogen herb. That means it helps regulate the body’s stress response. The root and berry of this plant are used to make tinctures and capsules. It’s anti inflammatory, immune boosting, balances blood sugar, reduces cortisol, regulates the HPA axis, and may reduce stress/anxiety/depression. I find it most effective when taken daily for months at a time. 

Astaxanthin 

Astaxanthin is a reddish pigment that belongs to a group of chemicals called carotenoids. It occurs naturally in certain algae and causes the pink or red color in salmon, trout, lobster, shrimp, and other seafood. In addition to improving heart health, preventing diabetes, and decreasing the risk of brain damage from stroke, it’s a powerful anti-inflammatory agent. 

Those are all great benefits, but the real reason I carry it on a long hike is that it serves as ‘internal sunscreen’ by protecting the skin from damage caused by UV (ultra-violet) exposure. On my entire CDT hike, I wore sunscreen less than a dozen times, and only on my face. I never got burnt anywhere besides my nose all summer. 

Spore-based Probiotics

Probiotics have a host of benefits, including boosting the immune system, supporting brain function, and enhancing mineral absorption. These healthy gut bacteria can even contribute to hormone balance and the production of certain neurotransmitters. There are many types of probiotic supplements to choose from. When I’m backpacking, I choose a spore-based probiotic because it’s more shelf-stable than other varieties.

Additionally, certain spore-based probiotics have been shown to heal leaky gut by closing tight junctions between colonocytes, increasing the thickness of intestinal mucosa, and up-regulating secretory IgA levels that support the body’s natural defense against infections. This is important for hikers who are likely consuming little to no probiotic-rich foods, and are eating a less-than-ideal diet.

Turmeric

Turmeric, Curcuma longa, is a root from the ginger family which is known for its bright orange color and it’s role in Indian cuisine.

It’s also one of the most powerful anti-inflammatory and antioxidant herbs available. It aids in the management of oxidative and inflammatory conditions, metabolic syndrome, arthritis, anxiety, and hyperlipidemia. It may also help in the management of exercise-induced inflammation and muscle soreness, thus enhancing recovery and performance in active people. It’s a must have in my book, on trail and off.

Adenosyl/Hydroxy B12

Adenosyl/Hydroxy B12 is a vitamin B12 blend formulated for nerve and mitochondrial support. Adenosyl/Hydroxy B12 helps support carbohydrate metabolism for the enzyme methylmalonyl-CoA as well as the synthesis of neuronal myelin.

I carried this one because pre-trail blood work indicated that I was low. Speaking of which, having blood work done is a good idea before you start guzzling supplements willy-nilly. You can order your own online, but it’s a good idea to work with a practitioner. These are real compounds with real effects in the body.

Multi Vitamin

A high quality multi serves as nutritional insurance for me. This is particularly important because of the lack of fresh foods in my diet (which is where we get many of our vitamins and minerals).

The micronutrients found in a good multivitamin play an important role in energy production, hemoglobin synthesis, maintenance of bone health, adequate immune function, and protection of body against oxidative damage. Additionally, they assist with synthesis and repair of muscle tissue. Exercise tends to deplete our vitamin stores more quickly. Therefore, I like to cover my bases with a high quality supplement. 

Colostrum

Colostrum is the first form of milk produced by mammals immediately after giving birth. It’s rich in antibodies and helps the body build a strong immune system. It also rebuilds gut health and can aid in recovery.

My favorite brand is Surthrival. It’s a powder that you dissolve in your mouth. I didn’t take it daily, but I included it in at least ⅔ of my resupply boxes. I’ve found it crucial in keeping my gut healthy and my autoimmune symptoms at bay. It’s best taken on an empty stomach.

Magnesium

I often took a magnesium powder dissolved in a small amount of liquid before bed. The purpose was to relax my muscles, aid in muscle recovery, and to promote sound sleep. I use this off trail as well. This is the powder I use. 

Let Food Be Thy Medicine

In addition to the above protocol, I also hid extra nutrition and superfoods into my resupply box where I could. This was particularly true in my smoothie, which I had almost every single morning on trail. 

Trail Smoothie

It includes a greens powder, coconut milk powder, collagen peptides, chia seeds, cordyceps mushroom powder, ground cinnamon powder, ground ginger powder, and sea salt. For the full recipe and why this is such a powerful, blood-sugar balancing way to start the day, read more here

There you have it. This is exactly how I complimented my healthy eating plan for more energy, immunity, and endurance on my sub-100 day CDT hike. For more resources on how to build strength, health, and resilience before your next adventure, see our online course Adventure Ready.

For a deep dive into performance nutrition and meal planning for backpackers, check out our online course on the topic.

Related: 

Healthy Lightweight 5-Day Meal Plan

Diet & Supplements for Managing Tendonitis Naturally

How to Choose the Best Electrolytes

Adaptogens for Athletes

How to: Supplementation on Trail

Free Guide: Supplementing Wisely

Thru-hiking with a Chronic Illness: Strategies ANYONE Can Use to be a Stronger Hiker

cdt

How I prepared for a sub-100 day thru-hike of the Continental Divide Trail

Let’s get something out of the way right up front: this post is not about the newest “biohacks”. Rather, it’s about the “basics” and how to build a strong foundation. These are the strategies that, if applied consistently, will give you the health you need to take on any adventure (chronic illness or not).

At least that’s been the case for me. I’m all for tactics, such as intermittent fasting, cold thermogenesis, infrared sauna, ketosis, etc., but if you haven’t mastered the basics, don’t waste your time or money on the other stuff.

By focusing on the concepts outlined below, I’ve become a stronger backpacker than ever before.

My Story

My outlook after I was diagnosed with Hashimoto’s and adrenal fatigue was bleak. I’d built my identity as a long distance runner and backpacker. My self worth directly correlated to the number of miles I ran or hiked each day.

After returning from the PCT in 2014 and discovering that all the symptoms I was experiencing were due to adrenal fatigue and an autoimmune thyroid condition, life got pretty dark for a while. 

I felt disconnected from my life and my body. Extreme fatigue had become the norm. My hair was falling out in clumps. I was gaining weight with no change in diet or exercise. I was depressed and listless.

On top of the physical and mental symptoms from my illness, I was grappling with losing my identity as a ‘young, fit, endurance athlete’. I was running 10 miles daily and had been a vegetarian for over 15 years. I believed I was the definition of health. I knew it was a waste of mental energy, but I couldn’t help but fall into the ‘why me?’ mindset. 

To make a long story short(er), I tried every trick in the book to get my health back: different diets, supplements, exercise routines, and protocols. My healing journey felt like I was taking two steps forward and one back. My progression towards wellness was far from linear, but there was indeed progress, even if it was subtle. Slowly I found my way out.

I’m not fully healed, but I’m strong enough to do what I love again: walk and run long distances in the wilderness. 

Fast Forward to 2019 

I’d been dreaming of this hike since before I got “sick”. Most thru-hikers complete the CDT in 4-5 months. My goal was to complete a sub-100 day hike. I needed to know that all the work I’d done on my health was worth it. My goal was to not just get out there, but to truly crush it. 

I wasn’t trying to be that ‘young, fit, endurance athlete with flawless health’. Rather, I wanted to demonstrate that with a commitment to true self care, that I could hike as well or better than I had pre-illness. In turn, I hoped it would serve as inspiration for anyone else struggling with their health; those who felt like their adventure dreams were out of their reach.

But first, I needed evidence that these strategies worked. I didn’t talk about my goal much before my hike because, honestly, I didn’t know how it’d go. 

I completed the 750-mile Oregon Desert Trail (ODT) in the fall of 2018 and felt great, but my pace wasn’t as aggressive as what I had planned for the CDT. Holding it together for 1 month on the ODT was one thing; holding it together for almost 3 ½ months on the CDT was quite another. Did I really have the health to do this when the memories of not even being healthy enough to run a few miles were still fresh in my mind? 

Thru-hiking is for EVERYONE (if you’re willing to put in the work)

Good health and fitness don’t just come naturally to me. I work for it. It’s a commitment and a priority. I work to be at my healthiest because it’s imperative for engaging in what is most important to me (getting outside) and for living fully.

There’s a stereotypical image of what a ‘thru-hiker’ looks like: mid-20’s, fit, white male (with long beard and short shorts). That’s not me. But I’m just as competent of a hiker.

I say that not out of hubris, but simply to remind you that there’s a place at the table for everyone. I also don’t mean to imply that competition, or a certain speed, or high mileage days, “should” be the goal. That was my goal because it was a proxy of health for me. And because I like to push my physical limits. It’s how I connect with the wild, externally and internally.

Adventure Ready is on online course designed to help you optimize your physical health so you can take on your next adventure with confidence. You’ll learn to master your mindset, find the ideal diet for YOUR body, develop a training plan that won’t result in overuse injuries, increase your energy, and much more!

The Method

Here’s how I built good health and prepared my body to perform optimally on a 3000 mile hike. These strategies will work, whether you have a chronic illness or if you’re just looking to be at your healthiest so you can get into the outdoors with confidence.

Master Your Mindset

First things first. It starts with what goes on in your mind. This applies when it comes to adventures, but in truth, it matters for anything in life.

I learned this lesson very clearly while hiking on the Appalachian Trail in 2009. I joined a friend for the start of his thru-hike, thinking I might thru-hike too, if it worked out. Nope. This is the wrong mindset with which to embark on any epic undertaking; particularly one which will require you to overcome challenges. When my off-trail life went haywire, I left the trail. I don’t regret the decision, but the point is that I hadn’t fully committed to thru-hiking. If I had, I would’ve found any way possible to make it work. Any obstacle can be overcome if you’ve committed and you know your desired outcome very clearly. 

Action: Before your next adventure, write down your desired outcome and include 1-2 sentences about WHY  you’re taking it on.

Dial in Your Perfect Diet

Pushing your body to the limits and maintaining the energy for 35+ mile days is much easier when you’re eating the right diet. I don’t suggest that there’s one single best diet for everyone, but you do need to figure out what works for your body. This is true for everyone, but it’s especially important with a chronic illness because the ‘wrong diet’ for your body could lead to a lot of inflammation.

For the endurance athlete, inflammation can impact performance and compromise immunity. The physical strain of hiking long days is already creating some degree of inflammation in the body, so limiting excess inflammation coming from other sources is important. 

Action: For information on eating a lightweight, nutrient dense trail diet, check out this free course

Prioritize Sleep

Perhaps the most underappreciated of the health pillars is sleep. Prioritizing sleep is HUGE. Research shows that “sleep disruption is associated with increased activity of the sympathetic nervous system and hypothalamic–pituitary–adrenal axis, metabolic effects, changes in circadian rhythms, and proinflammatory responses. In otherwise healthy adults, short-term consequences of sleep disruption include increased stress responsivity, somatic pain, reduced quality of life, emotional distress and mood disorders, and cognitive, memory, and performance deficits.”

Action: Maintain a consistent sleep time. Stay off screens at least an hour before your planned bedtime (blue light disrupts melatonin production). Aim for 7+ hours per night.

Optimize Gut Health

“All disease begins in the gut.” Hippocrates nailed it. Microbiome research is one of the hottest areas of research, with recent findings revealing that gut health has implications in a wide variety of diseases  including obesity, diabetes, irritable bowel syndrome, inflammatory bowel disease, depression, and cardiovascular disease. For the long distance hiker, good gut health means better immunity, increased absorption of essential nutrients, decreased inflammation, and increased motivation, to name a few of the many benefits.  

Action: Include plenty of probiotic-rich fermented foods (kimchi, sauerkraut, kvass, etc.) in your diet. Feed those probiotics their favorite food: soluble fiber. Think oats, beans, citrus, apples, lentils, and peas. Consider a professional-grade supplement (click here for 10% off). 

Keep Stress in Check

Despite the research that’s piling up showing the negative impacts of stress, and even the World Health Organization (WHO) pointing to stress as the primary health epidemic of the 21st century, I dismissed the real impact of stress for a long time. In doing so, I’d unintentionally put a limit on how much my body could heal. 

Stress not only creates hormone disruption and systemic inflammation, it can impact focus, memory, gastrointestinal function, and the cardiovascular system, to name just a few of it’s wide-ranging impacts.

Could this invisible force really be impacting my overall wellness that much? After fixing my diet, my training, my sleep, and my gut health, and still struggling with some lingering symptoms, it was apparent that I needed to address any other factors that could be at play. It’s an ongoing practice, but when I prioritize joy and keep a watchful eye over where stress is seeping into my life, I’m noticeably happier and healthier. 

Action: Ask yourself, “What are all the ways, small and large, that stress has seeped into my life? More importantly, what can I do to eliminate or mitigate it?”. Some of the methods that work for me include a morning journaling practice, meditation, running, walking in nature, baths, and calling people I care about. 

Train Your Body

This strategy comes last because it matters, absolutely, but if all of the above is not in place, a good physical training plan can only take you so far. I tend to maintain a decent base fitness level year round through hiking, running, HIIT workouts, and yoga. Other than a few longer weekend hikes, I didn’t do too much extra training for the CDT.

Depending on where you’re starting from, everyone’s physical training plan will look slightly different. In general, start low and slow, and build up from there.

Action: Develop an appropriate individualized training plan. To avoid injury, it’s important to assess where you are now and build up fitness gradually. You can work with a trainer or enroll in our Adventure Ready course for guidance on how to assess your current fitness, find potential weak spots, and build a training plan that will get you ready for your hike without injury.

It may be cliche at this point, but it’s been my experience that our greatest struggles turn out to be our greatest lessons. That’s certainly been true for my journey as an endurance athlete with an autoimmune illness. I wouldn’t have asked for it, but it’s caused me to dive deeper than I ever would have otherwise into what it means to create true health and resilience. 

We dive much deeper into these topics in Adventure Ready, an online course designed to help you up-level your physical health so you can take on your next adventure with confidence!

My Greatest Lesson from 2800 miles of Backpacking this Summer

This post was originally written for WishGarden Herbs.

hope pass, stillness lesson

Great Adventures, Great Lessons

Between June 17 and September 23 of this year, I hiked roughly 2800 miles from Canada to Mexico, alone, along the Continental Divide Trail. 

As I’ve reintegrated back into “real life”, I’ve been processing the many lessons that were birthed during this time of deep solitude spent in nature. The lessons are many, and they include both the practical (i.e. improved navigational skills) and the conceptual (i.e. the power of surrender). If pressed to choose just one of these lessons as being the most valuable, I’d undoubtedly say that it’s been the increased ability to find stillness within.

What is stillness? Why does it matter? How do you get it?

By stillness, I’m referring to that inner state that’s available when all the mind chatter quiets. It’s a steadiness that exists amidst any chaos that may be swirling around me. From this state, I respond rather than react. There’s more space for deeper reflection, gratitude, and happiness. 

feet in water lesson

I believe stillness is a natural state for us and it’s our job to tune into it. There are many ways to do this. Being immersed in nature on a long backpacking trip is one way to get there, and the reasons for this are many. 

Firstly, engaging in challenging activities like mountain climbing, cultivates presence and stillness because they require every ounce of attention in order to avoid injury or death. When you’re in the zone, there’s no room for mind chatter. You must be in the now.

Additionally, the solitude found on a long walk in nature is a gateway to stillness. When we remove the external noise, it gives us space to just be. True solitude involves not only being alone, but also removing all external inputs, such as music or podcasts.

Furthermore, when you’re surrounded by wilderness, it’s a reminder that the stillness present in all of nature is also present in you. In the words of Eckart Tolle, “Seek out a tree and let it teach you stillness.” If you’ve ever sat alone in a forest, you understand this. You can feel the stillness and you begin to embody it. 

colorado meadow stillness

A long distance hike also facilitates stillness if you learn to let go of expectations. For example, if I focus solely on how far I have to walk to get to my destination (Mexico, in this case), I’m easily frustrated because I rarely meet my own expectations for how many miles I “should” be walking in each hour or day. Once I stopped treating the journey as a means to an end, and became present to each step, breath, and moment, life was much more enjoyable. 

These are just a few of the ways long distance backpacking increased my ability to find stillness, but it’s not the only path to reach this inner state. Fortunately, you don’t need a 2800 mile walk in the woods to get there. Time in nature certainly helps, but you can implement the strategies of presence, solitude, and removal of expectations in the “real world” as well. 

backpacking lesson sunset

Additional strategies which can be used anywhere to tap into that place of stillness include journaling, meditating, focusing on the breath and/or body sensations, getting proper sleep and nutrition, reducing inputs (less phone time and reading the news), and by looking for beauty in everything. 

Increasing your ability to create stillness within yourself is so valuable because it taps us into the present moment, which is where all of life exists. The now is truly all we have and learning how to access it through presence and stillness can create true freedom and happiness. 

CDT lesson

Going into this adventure, I had many intentions, but developing a heightened state of presence and stillness wasn’t one of them. I’ve realized, however, that it’s likely the top reason for why I keep seeking nature immersion again and again. 

If you’re interested in how I prepared for my CDT hike, read more about the preparation here, the food I packed here, and a sample meal plan here.

Like what you’re reading? Join our newsletter to be the first to know when new articles are published and to receive insider-only content on the new and full moon!